Starting Out
In macro photography, excellent results can be obtained on a shoestring. It is of course tempting to spend the fortune that is burning holes in your pocket on equipment. But the bulk of that money would go towards bells and whistles, not image quality. I highly recommend exploring cheaper options first that will help you find out how committed you are, what you want to photograph and how, and how much pain you are willing to suffer in the quest for higher magnification. The pain isn’t just metaphorical: I sometimes wish I had a back specialist among my friends.
Start with a clip-on macro lens for your smartphone. If you have access to a nifty-fifty or a moderate wide-angle lens with a manually operable aperture or to an old enlarger lens, reverse-mount it on your camera with an inexpensive adapter ring. Play with a set of extension rings. Put a Raynox close-up lens on one of your existing lenses. Buy used macro bellows (make sure they are light-tight) and attach whatever manual aperture lens you can find (scavenged scanner lenses are very interesting). Use flashlights to illuminate your subjects. Make light modifiers from fast food containers and aluminum foil. The internet, unlike the metaverse, is a great resource. It offers libraries’ worth of information and a community eager to help.
My macro setup at this point, which works for me but needn't work for you, is about as simple, sleek and lightweight as it gets, and it was not even terribly expensive if I discount all the false starts and dead ends; I'll do some show and tell below. It took me over a year of tinkering to get it all sorted out, and now I have a ragbag of old camera and enlarger lenses, microscope objectives, bellows, rails, lighting equipment, and a plethora of adapters from China, Russia, and Portugal languish in the closet. Ah, hindsight! At least the Russian adapters should hold their value.
The following remarks may make it appear as if photographing bugs is a very complicated technical undertaking. To be fair, there are more technicalities involved than in other areas of photography, but they can all be worked out during practice so that they fade into the background on game night.
Depth of Field
The cardinal problem in macro photography is depth of field, the distance from the closest to the farthest acceptably sharp object in a photograph. The depth of field shrinks with increasing magnification and becomes razor thin in the macro world, too thin for even the most stalwart bokeh aficionado. It grows, conversely, with a decrease in aperture size. So the question is: can a satisfactory depth of field be achieved in macro photography by stopping down the aperture?
Let me begin by dispelling a common misconception. It is widely believed that camera systems with smaller sensors inherently produce a greater depth of field and are thus better suited for macro work. Any old smartphone would seem to prove the point: its pictures have such an extended depth of field that manufacturers feel compelled to devise computational tricks to selectively soften them for a more “professional” look.
Take my phone as an example. According to the spec sheet, it has a lens with a fixed f/1.8 aperture and a “28 mm equivalent” focal length; the image sensor measures 7.06 mm diagonally. From this information, we can work out the actual focal length of the lens. The equivalence lingo is a baroque way of specifying the lens's angular coverage. “28 mm equivalent” means: the phone camera covers the same angle of view as a 28 mm lens on a full-frame (FF) sensor. “Full-frame,” in turn, is adspeak for sensors the size of the old 35 mm film format. The diagonal of the 35 mm film frame and hence of “full-frame” sensors is 43 mm. For a given angular coverage, the focal length of the lens scales with the sensor diagonal (leaving aside subtleties to do with aspect ratios). The focal length of the phone's lens must therefore be 28 mm multiplied by the ratio of the sensor diagonals, 7.06/43, or 4.6 mm. The aperture then works out to be 4.6 mm divided by the f-number 1.8, or 2.6 mm.
What if we stopped down a true 28 mm lens to 2.6 mm? A 2.6 mm aperture in a true 28 mm lens corresponds to f-number 11 (28 mm ÷ 2.6 mm ≈ 11). Photographs taken at f/11 with a 28 mm lens exhibit, it turns out, exactly the same depth of field characteristics as my phone pictures. You can easily verify this with your own phone and camera. So, whatever advantages a system based on a smaller sensor may have, an inherently greater depth of field is not among them.
While a 28 mm FF lens at f/11 – or, equivalently, my phone – delivers plenty of depth of field at the low magnification ratios of everyday photography, things look quite different at higher magnifications. The masthead photo above, taken with the phone, illustrates this: at quite moderate magnification, the depth of field is already too shallow to cover more than the mantid's head. (Notice, by the way, the rather unpleasant bokeh, especially in the smeared-out dial markings. I don't know how other phones fare by comparison, but for me it is one reason to opt for a "real" camera.)
Let us look at a macro example. The following images show depth of field at 1:1 magnification and various aperture settings for my preferred setup: a 20 megapixel Olympus E-M1 II Micro Four-Thirds (MFT) camera with a 60 mm f/2.8 macro lens (RAW files with Lightroom development defaults). Click on the thumbnails to compare. 1:1 magnification means that the subject in the plane of sharp focus appears at life size on the sensor. I focused on the hair at the base of the dead wasp’s nearer antenna because sharpness is easier to gauge there than in the compound eye. The images are uncropped and resized to 1800 × 2400 pixels; the insets are 200% crops. The aperture settings are nominal f-stops as reported by the camera. The corresponding effective f-stops that take account of the light loss due to magnification are roughly half the nominal values, f/5.6 instead of f/2.8 etc. Calculating them gets into thorny issues about asymmetric lenses with variable pupil magnification. (Nikon cameras are exceptional in that the numbers they display in the viewfinder are calculated effective f-numbers. These are reputed to be accurate for Nikon lenses, but for my Sigma 105 mm f/2.8 lens, they are off by half a stop.)
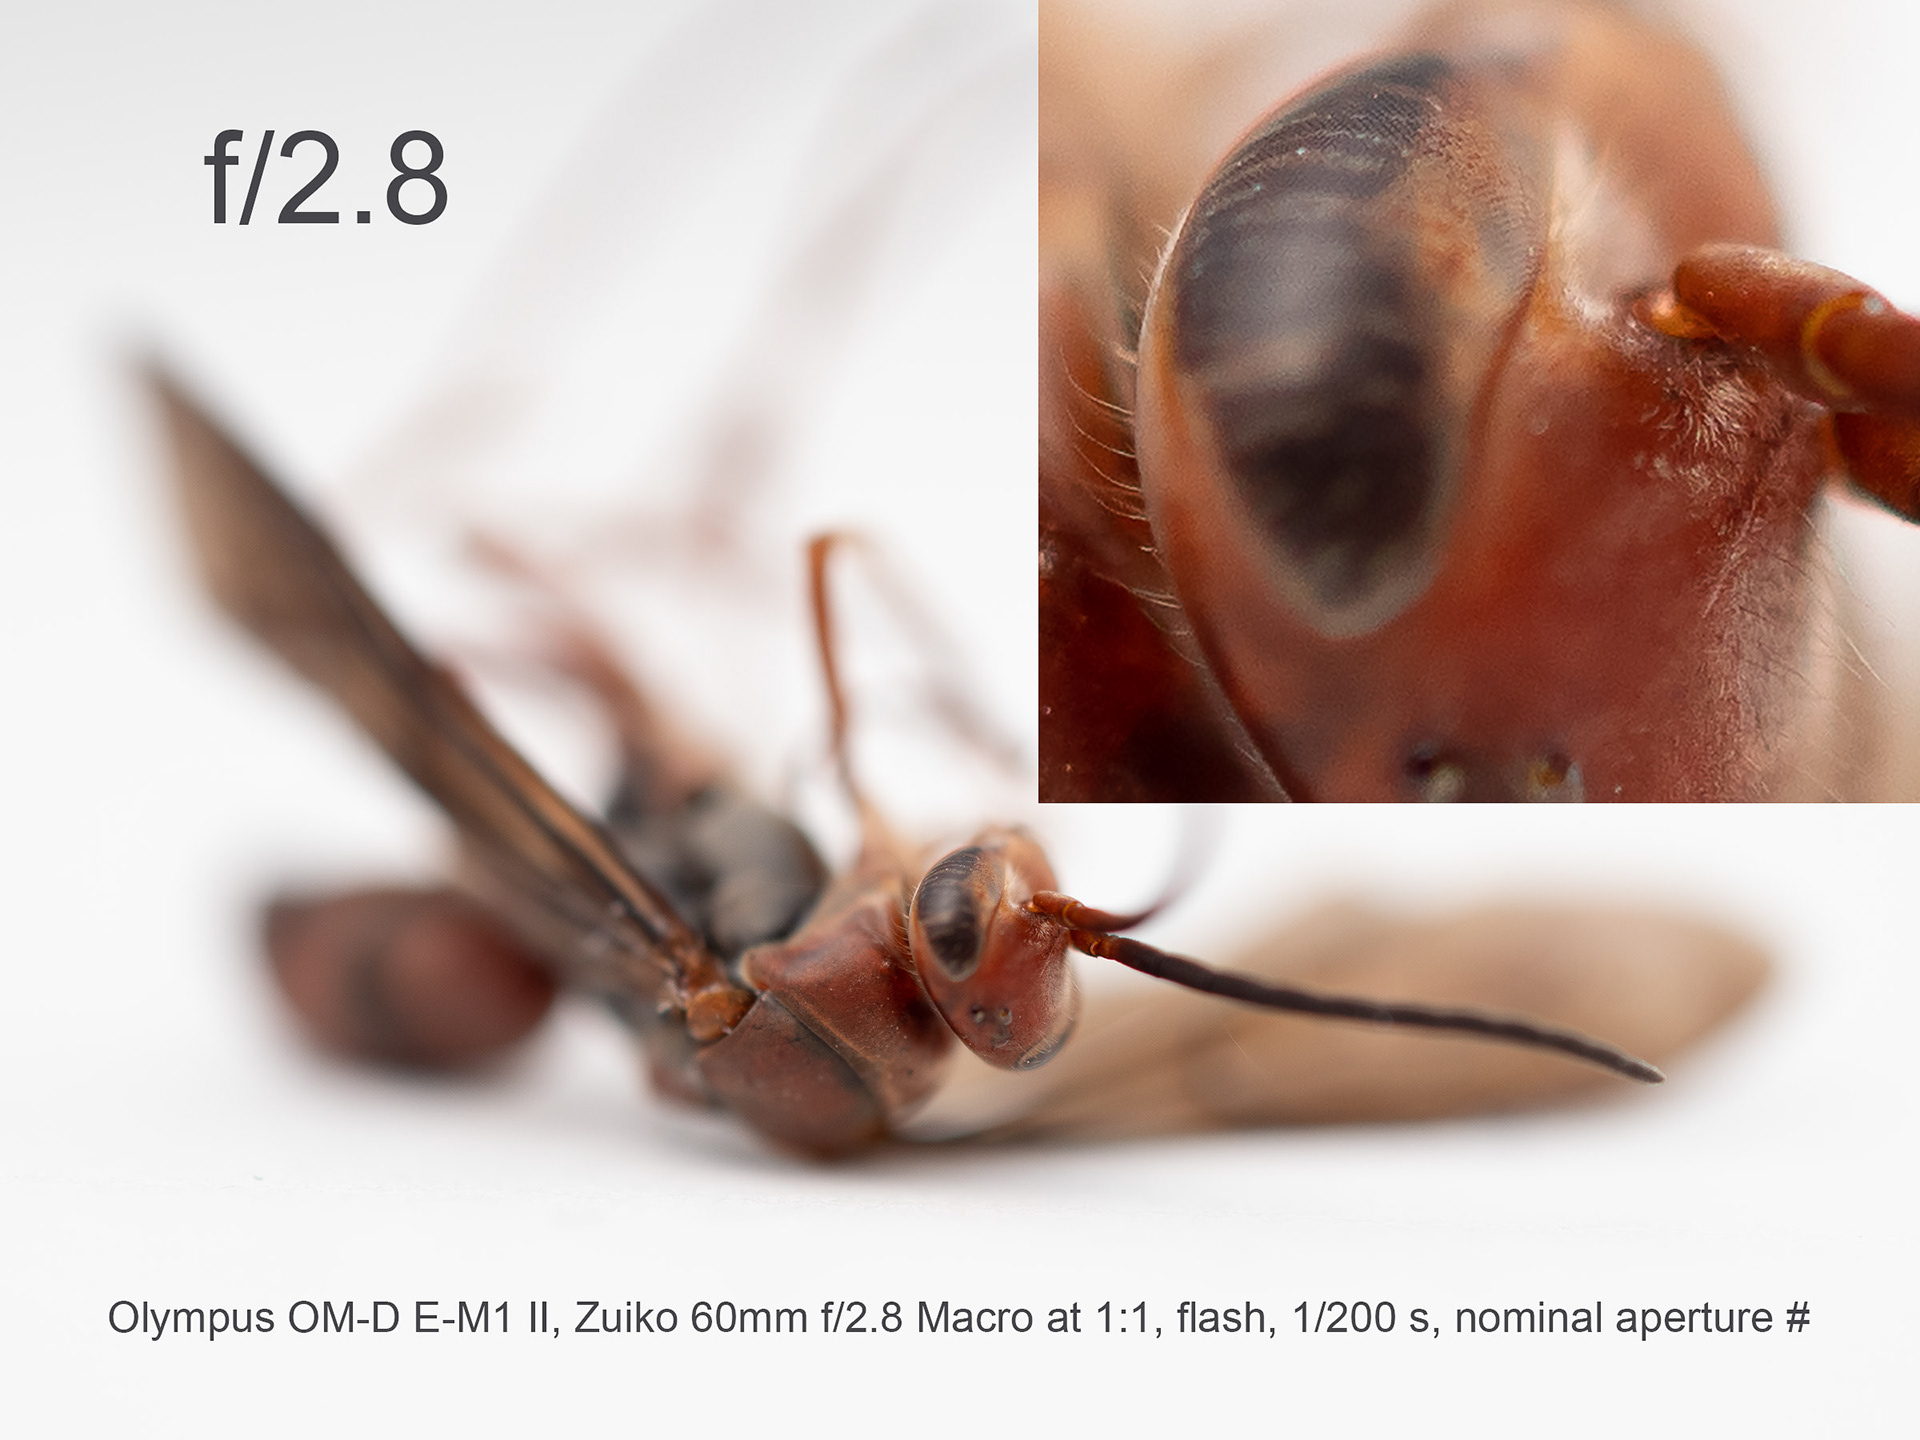
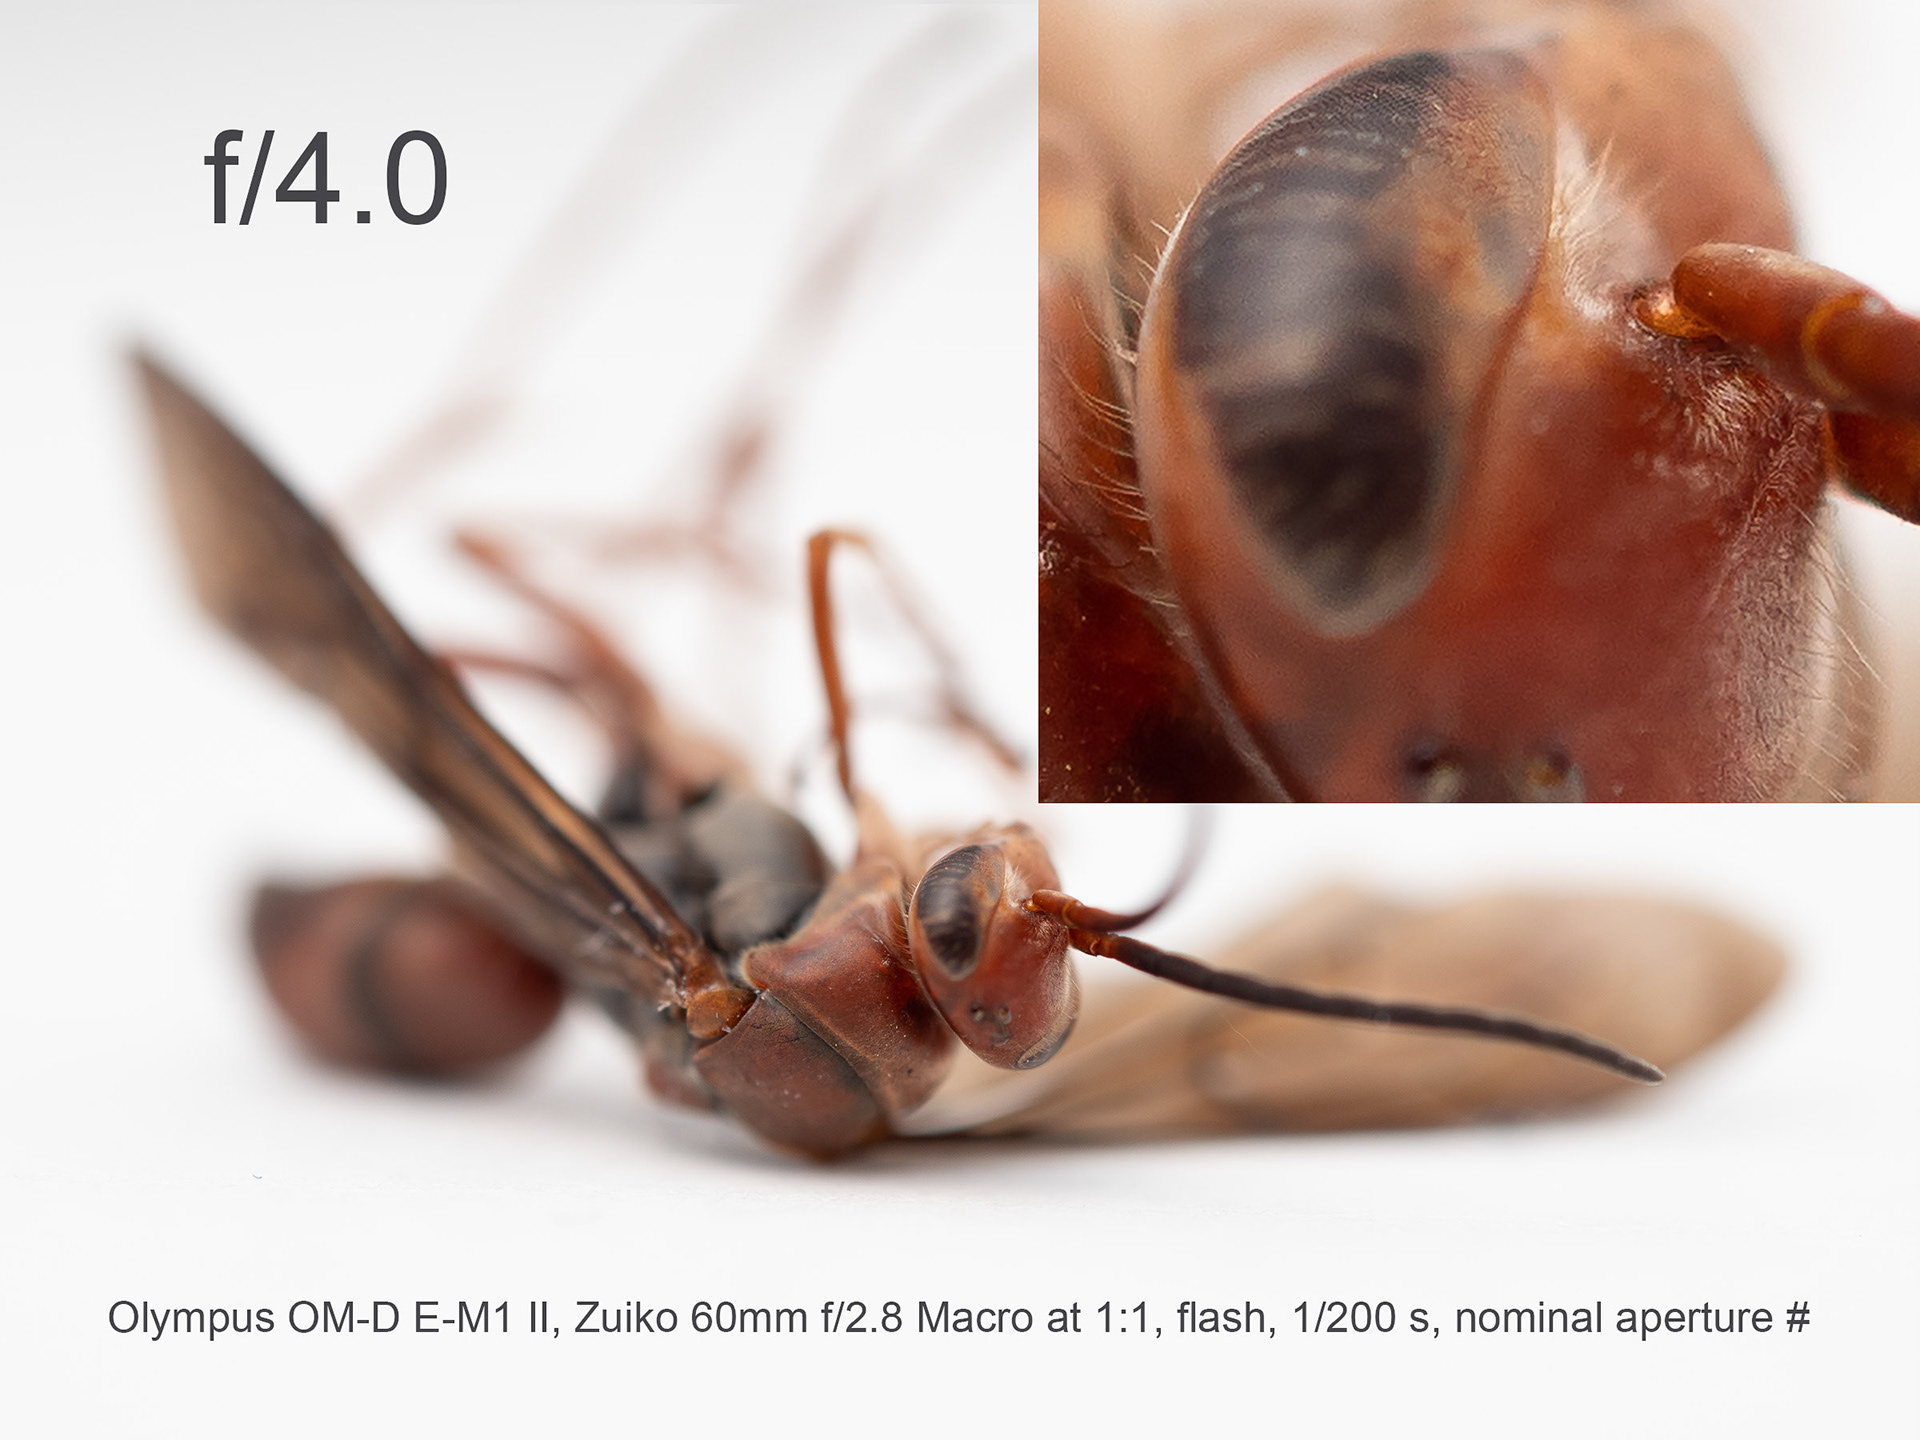
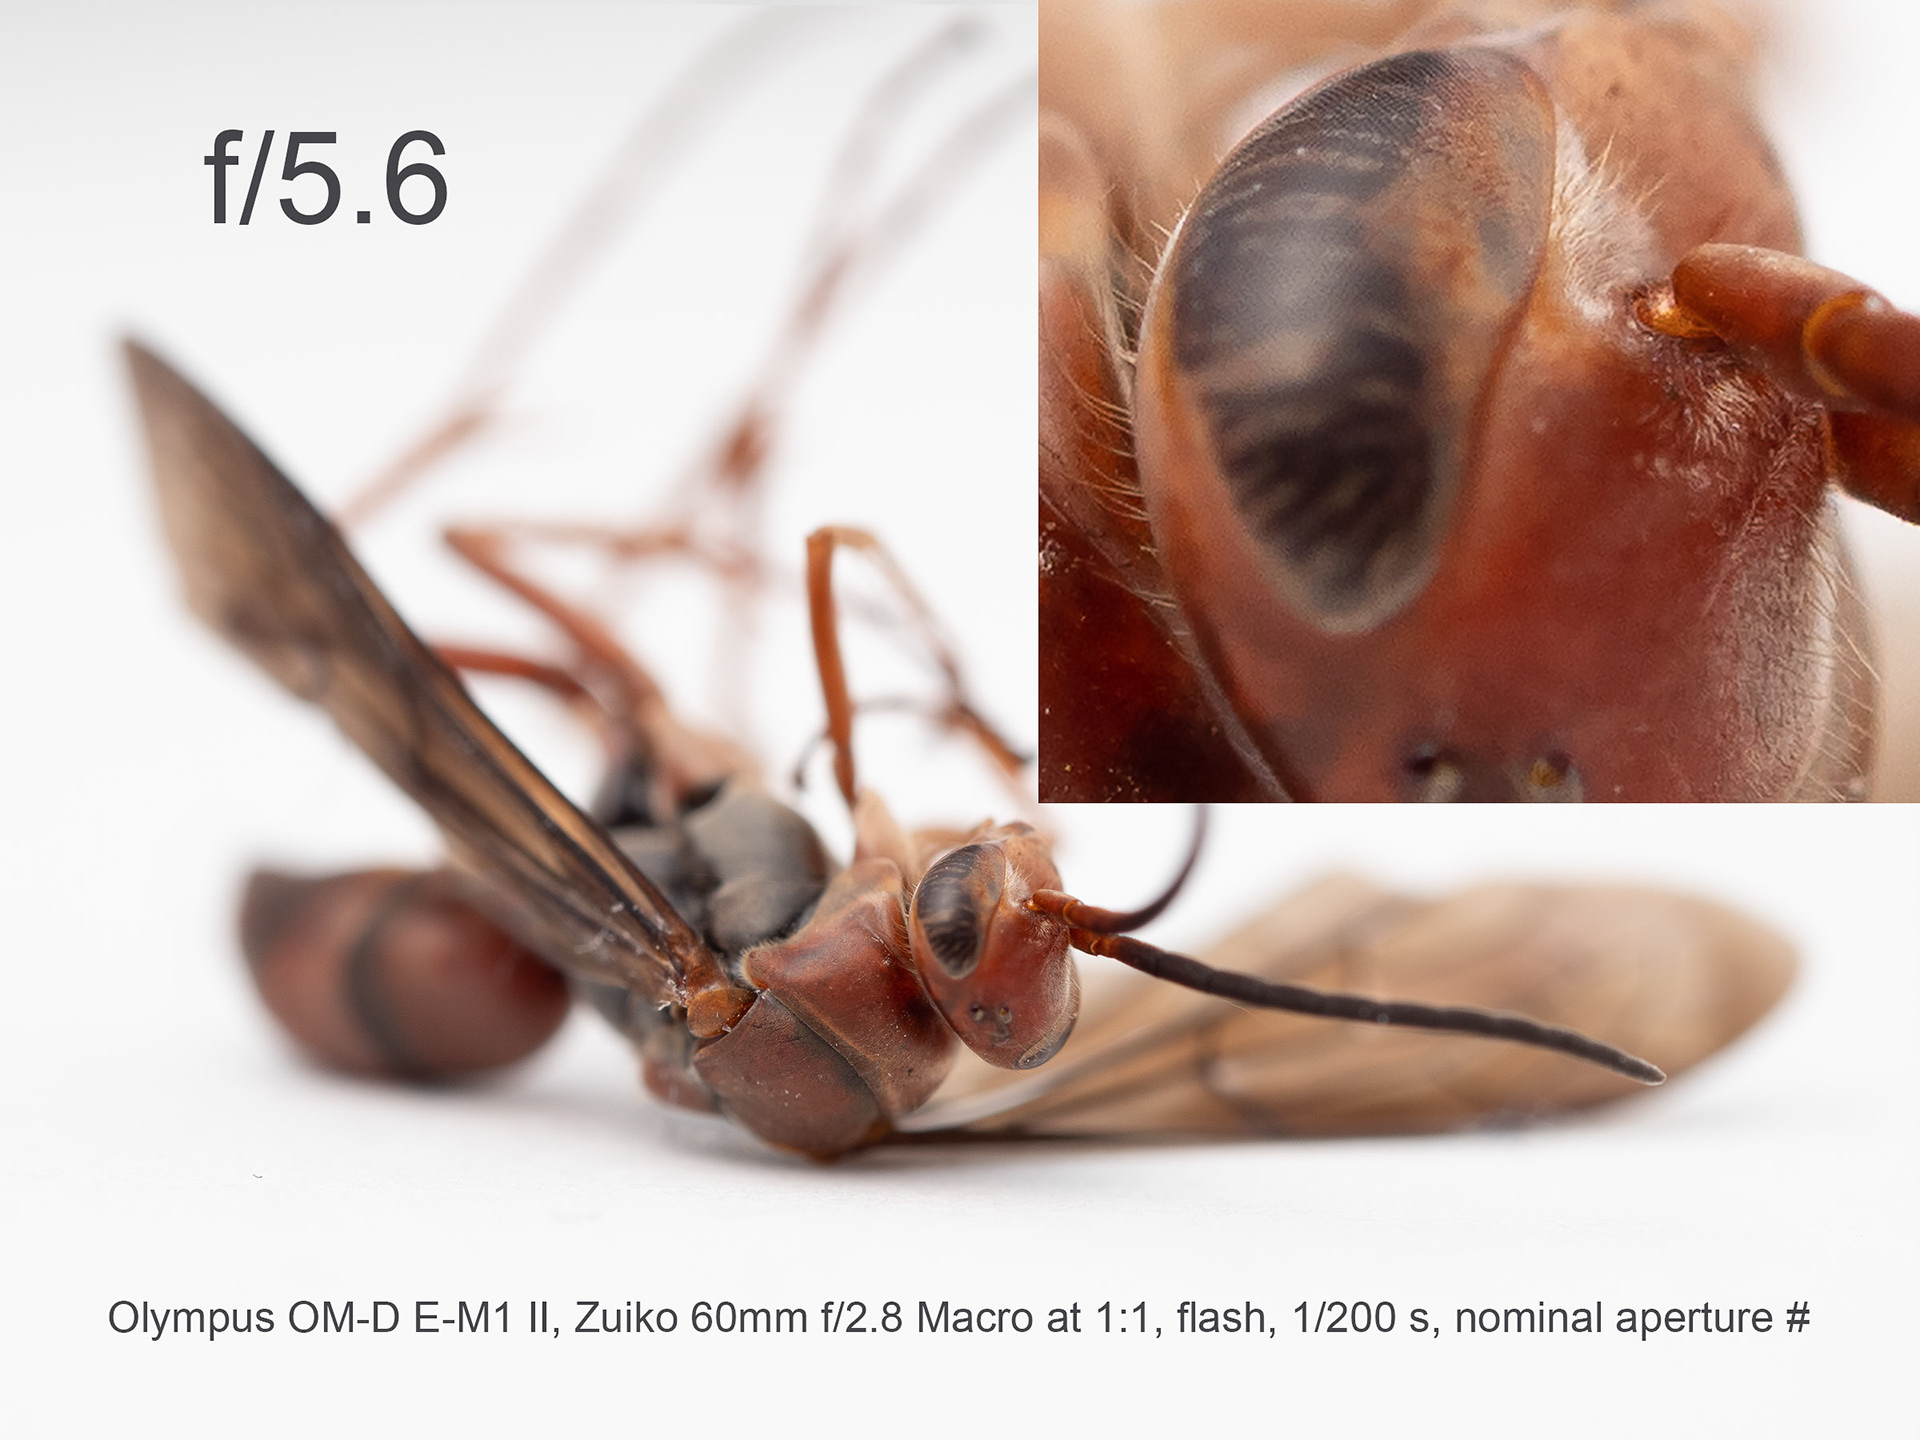
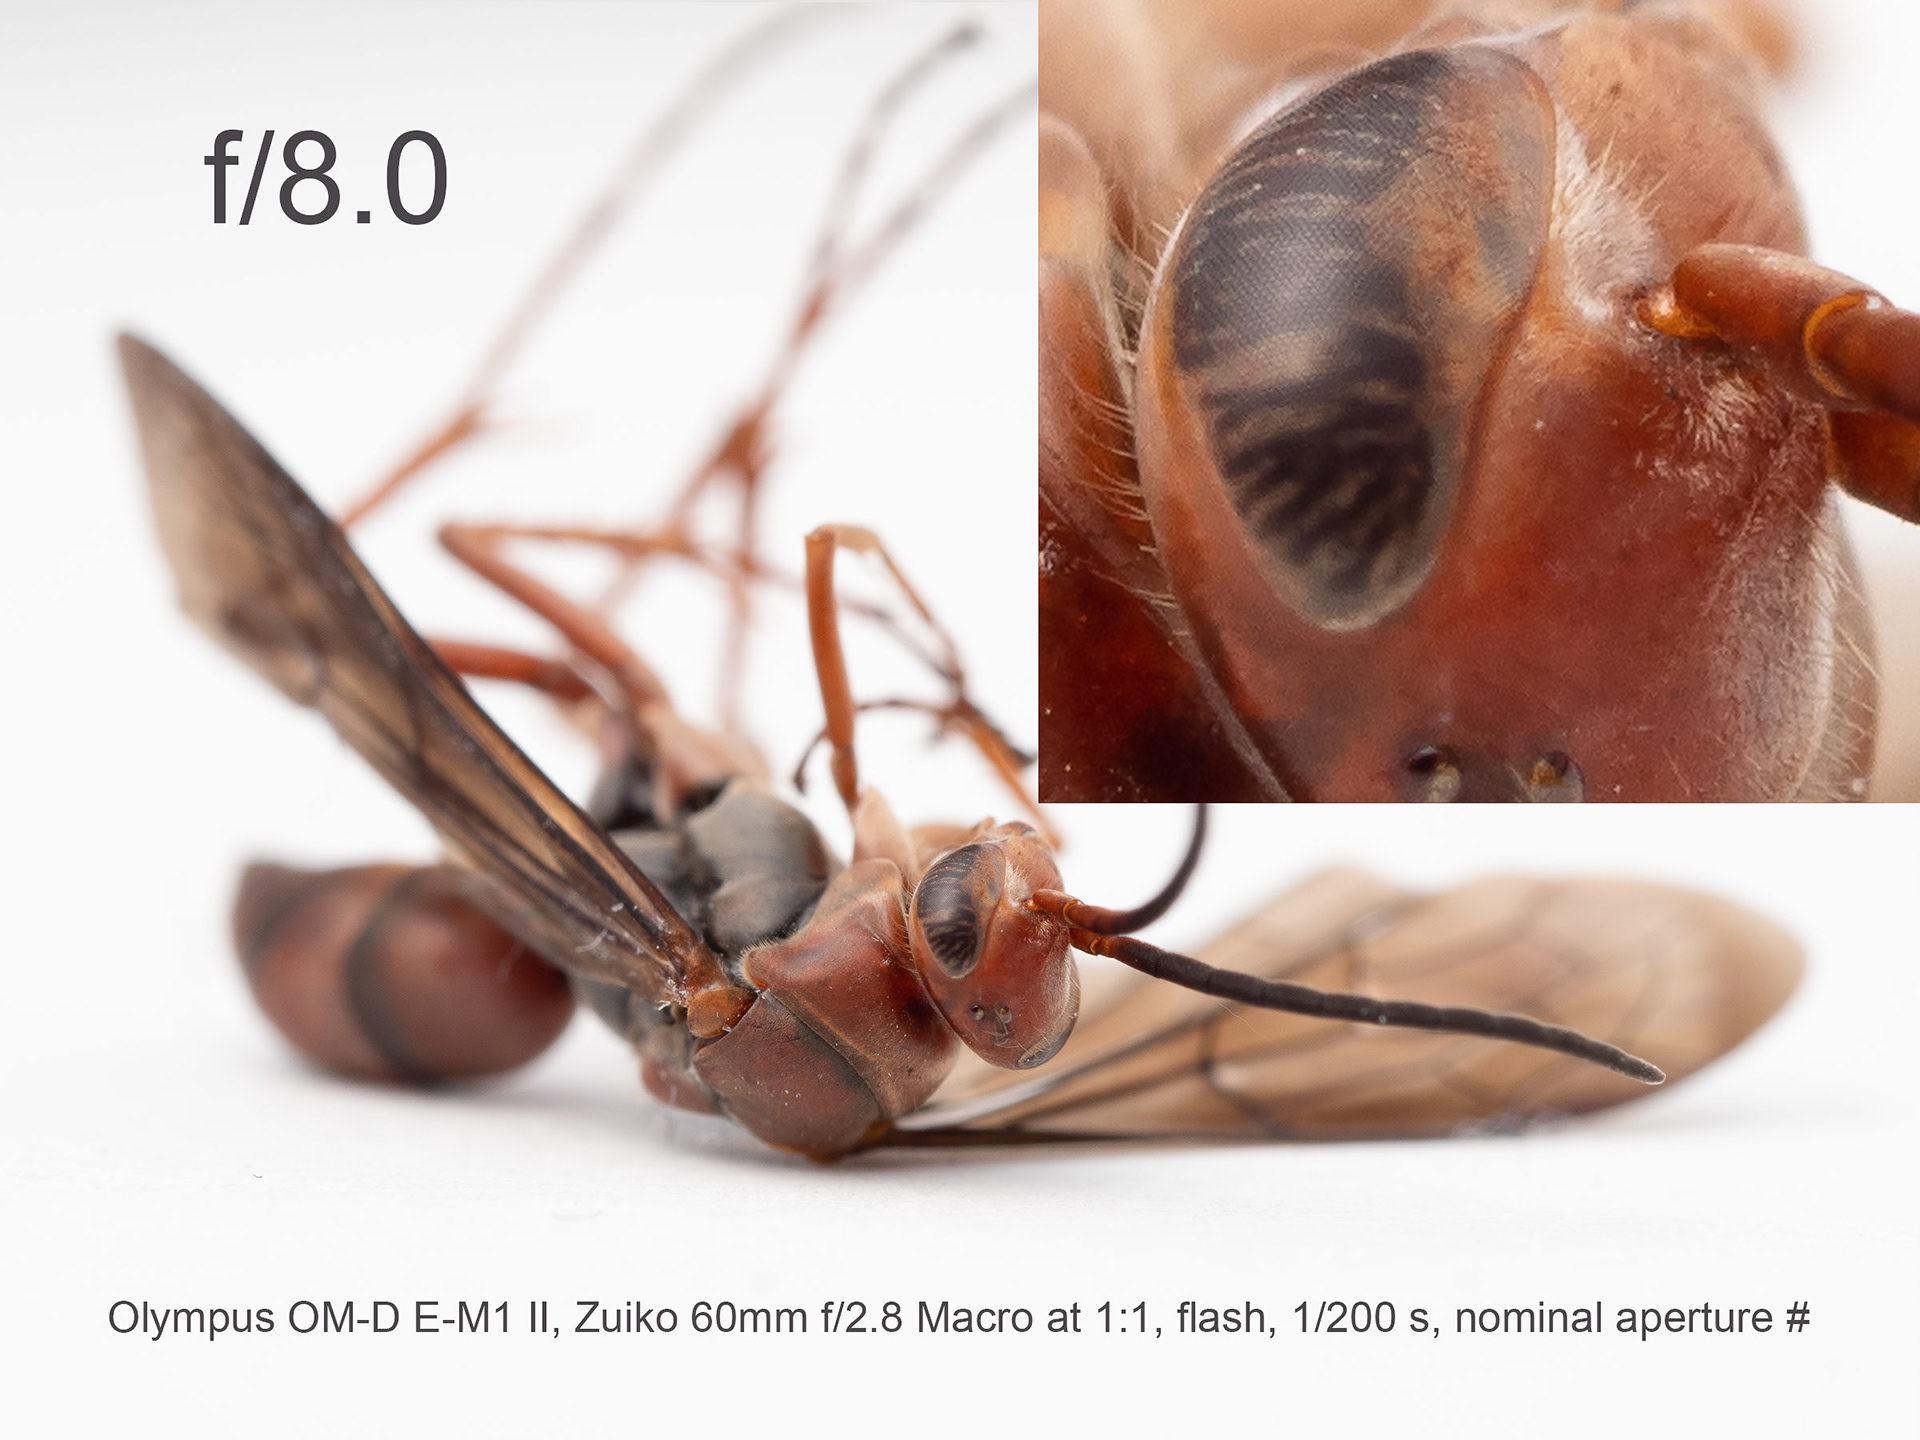
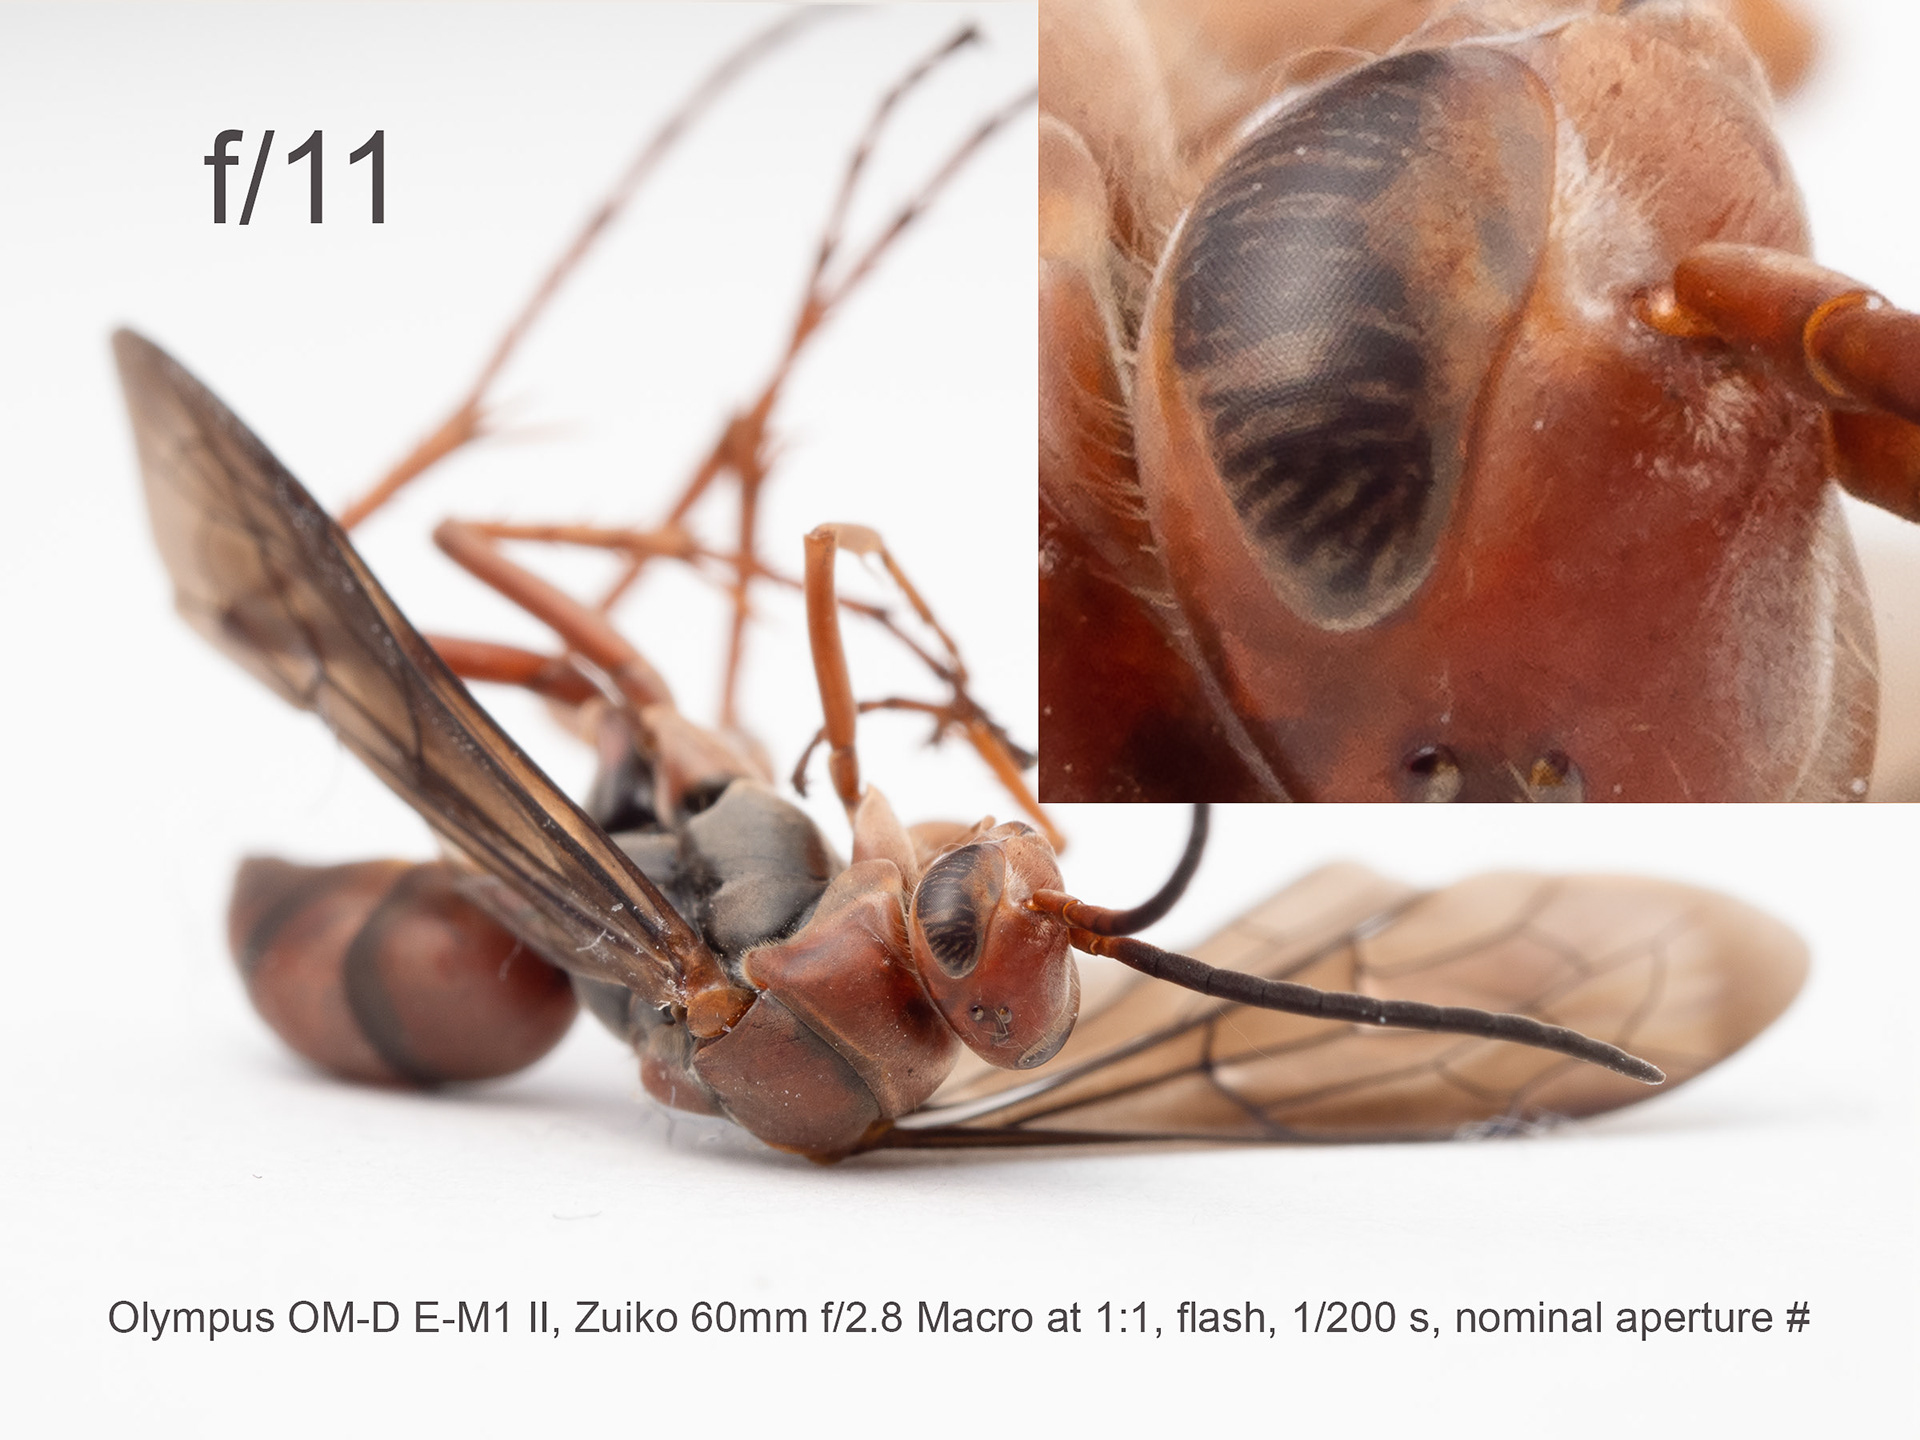

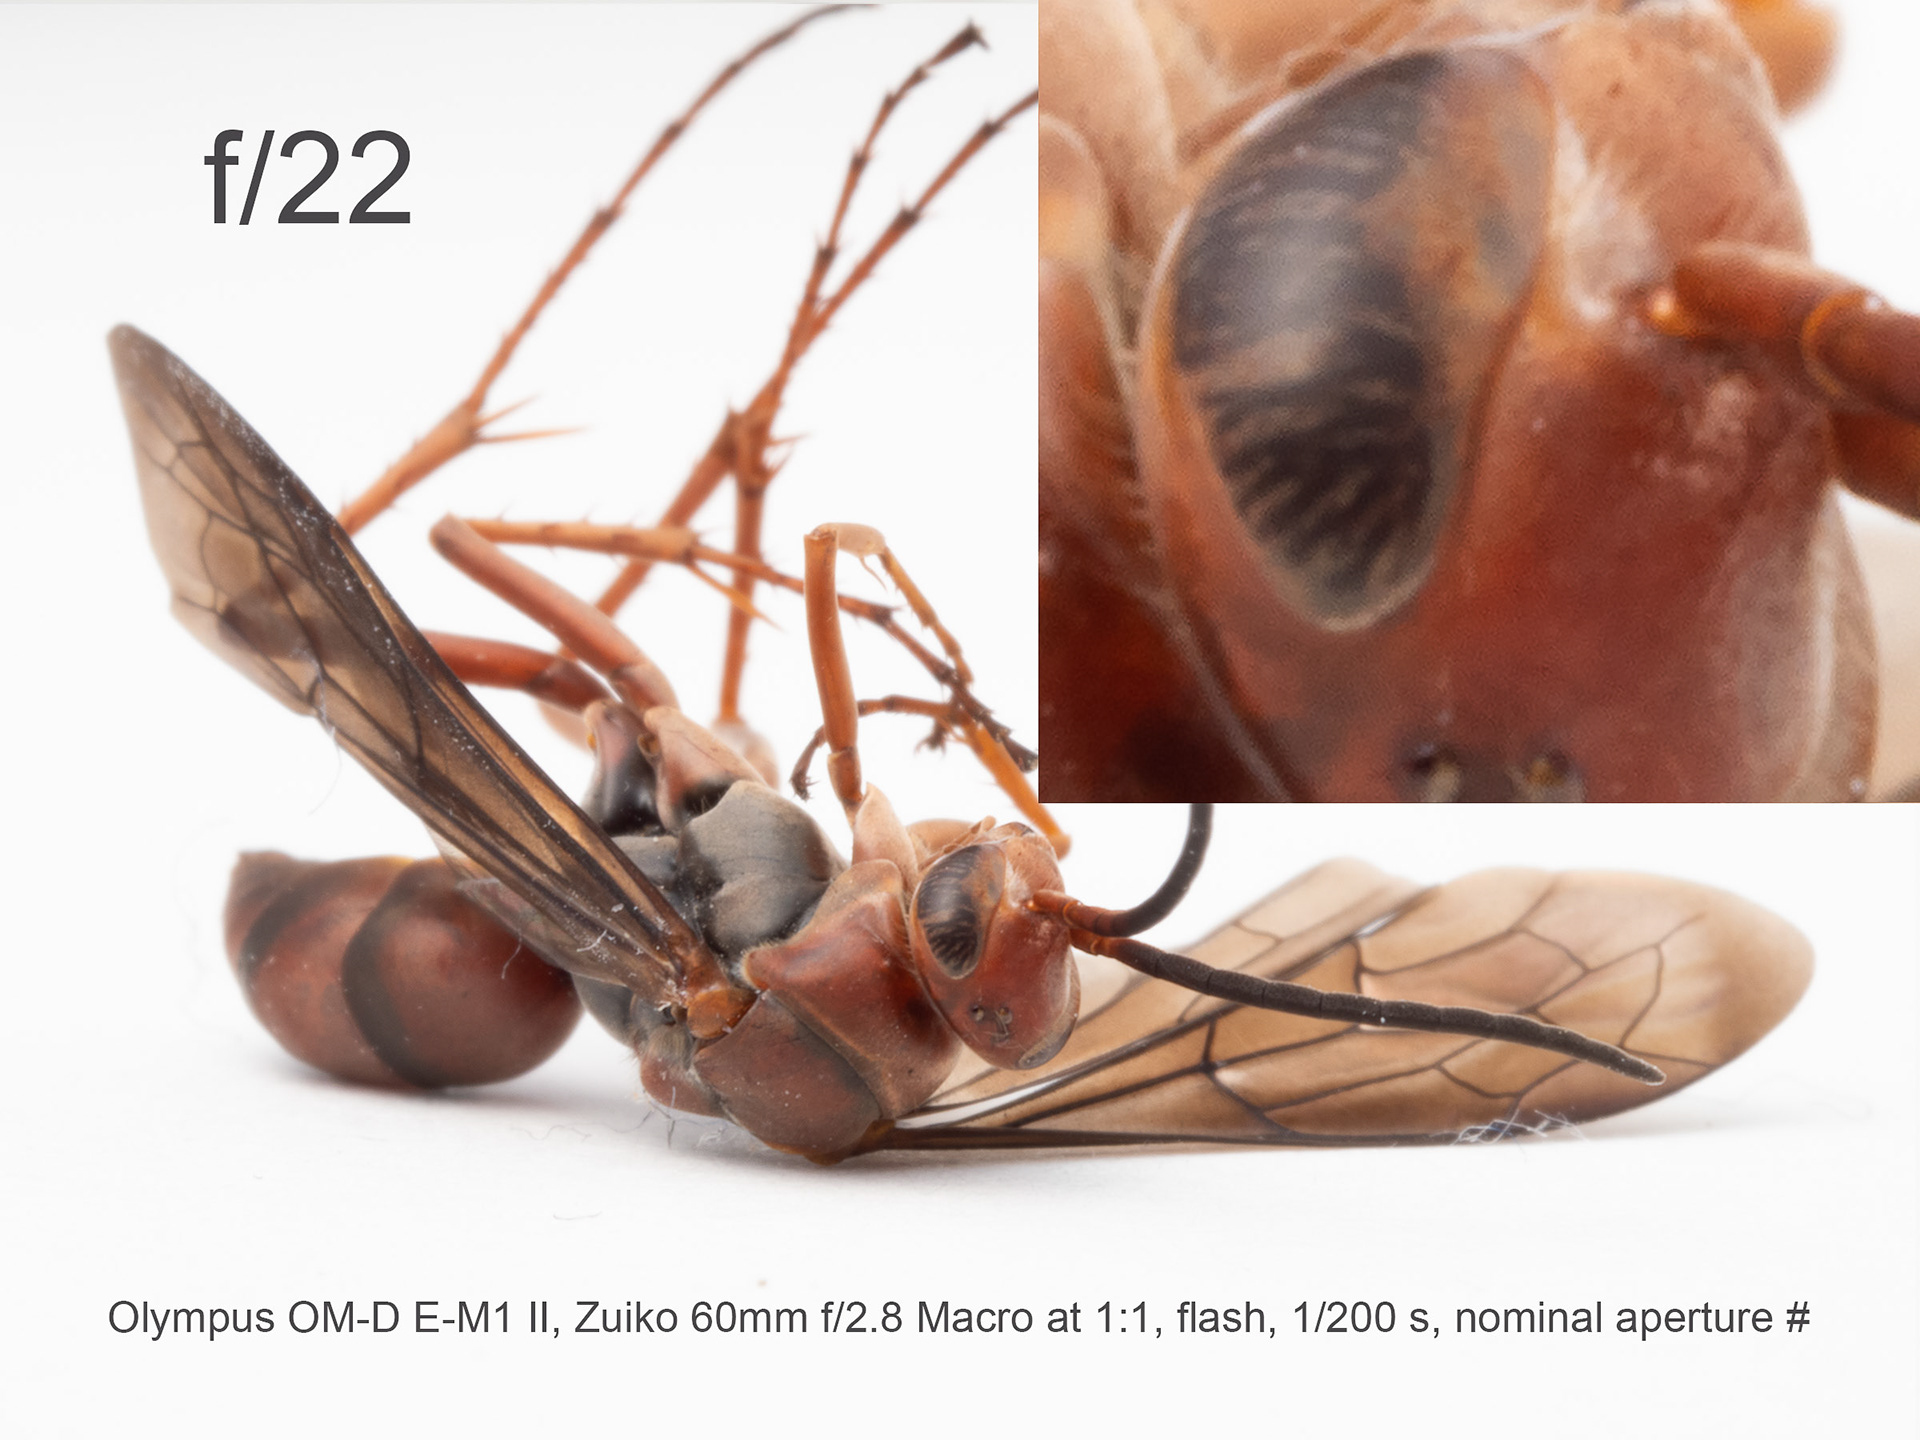
From f/2.8 to f/4, things progress nicely except for the moderate focus shift that many lenses exhibit. The depth of field increases and in-focus detail is crisp. At f/5.6, micro detail begins to look at bit softer. At f/8, small detail takes a hit, by f/11 all detail is quite blurred, f/16 looks bad, and f/22 is a complete mess. The deterioration at f/8 is visible in 18" × 24" prints and obvious in 30" × 40" prints. The culprit here is diffraction.
Diffraction is what happens to light when it passes an obstruction: it gets bent out of shape. The round aperture in a photographic lens turns what should be a neat image point on the sensor into a fuzzy pattern of concentric rings. The pattern's bright center, called Airy disc after the 19th century astronomer who gave the first theoretical account of the matter, is where most of the light energy is concentrated. The Airy disc's diameter is directly proportional to the f-number: at f/5.6 it is twice as large as at f/2.8. It also grows, albeit in more complicated ways, with increasing magnification.
A photographic image is made up, not of points, but of a gazillion overlapping Airy discs. The larger these are, the blurrier is the image. Stopping down the aperture or increasing the magnification causes larger discs and thus blurrier images. It's basic physics for which there is no technological remedy. (One reason for the girth of fancy telescopes is that only a large aperture can deliver high resolution. The other reason is that a large aperture collects more of the faint light from distant stars and galaxies. A telescope's depth of field is therefore very shallow at earthly distances, but it is more than sufficient at astronomic scales where image magnification is near zero.)
With my preferred setup, I wouldn't want to stop down past f/5.6 at 1:1 magnification; f/5.6 is my personal 1:1 diffraction limit. This is based on judging sharpness at the limit of what the system can resolve. There is an alternative approach where sharpness is judged in an image of some fixed size, and a limit for acceptable blur is set accordingly. Whenever the final image is smaller than what would be required for showing the finest detail the system can resolve, one can adopt a smaller f-stop as the cutoff point because the level of detail harmed by the increased blur would not show up in the image in the first place. On this approach, the highest acceptable f-number can be extremely high if the final image is correspondingly small. This is another way of saying that the blurriest file looks great as long as it is displayed small enough. Witness Instagram. Since I don't want to be hamstrung later by limiting myself to a certain image size at the time of exposure, I stick with the first approach that aims to operate the system near its highest resolution.
So does stopping down solve the depth of field problem? You be the judge. The dead wasp illustrates the situation with MFT at 1:1. With different camera systems, the situation is not substantially different (I spare you the details). At lower magnification, the problem is less acute, at higher magnification, it is more acute. I, for one, am bothered by the fact that in none of the pictures above more than a slice of the wasp’s eye is in sharp focus. And I am not content with 1:1 magnification. I would like to see the entire eye in focus, and at a higher magnification ratio.
Focus Stacking, Light
I often work at magnifications around 2:1. At that level, diffraction blur sets in already at (nominal) f/4, which leaves only the merest sliver of the wasp’s eye in focus. We have reached the limit of what is optically possible.
Enter computational photography. We can create a sequence of exposures where we shift the plane of focus slightly from one exposure to the next. The sequence can then be digitally assembled into one overall sharp image. This focus stacking technique is what I used for the majority of photographs in Distant Relations. The number of exposures per stack depends on the choice of aperture, magnification, and desired look. My average seems to be around fifty, with a lot of variance. Under the right conditions, the process can work miracles. But be forewarned: the slightest movement during the exposure sequence can ruin the result.
As I hinted already, magnification entails light loss at the sensor. This is easy to see in the simplest case of a single-element lens without any additional mechanical aperture. The lens acts as the light source illuminating the sensor. Focusing closer moves it away from the sensor and thereby decreases the sensor’s share of the light it sheds. At 1:1 magnification, the lens is twice as far from the sensor as at infinity focus, and the light intensity at the sensor has dropped to one quarter (one over two squared, or two stops less light). The story is more complicated for real lenses, especially those with an internal focusing mechanism, but the upshot is the same: the light intensity at 1:1 magnification is roughly two stops lower than at infinity focus.
This magnification-induced light loss creates an illumination problem because we are boxed in already as regards the three exposure parameters: we have little leeway to open the aperture, we need a fast shutter speed to stop motion, and we need a reasonably low ISO setting to keep noise in check. Many macro photographers therefore resort to flash.
Shooting focus stacks with flash can yield superb results by allowing very low ISO settings and freezing motion (within frames, not across frames). But flash is no panacea. First, its recycling time can slow down the sequence to the point where too much patience is asked from the bugs and the wind. Second, flash exposure in most cameras works only with the mechanical, not the electronic shutter. This puts a lot of strain on the shutter mechanism because a single stack tends to involve already dozens of exposures, and one session results in many stacks, not least because it's wise to overshoot in order to guard against unpleasant surprises at the editing stage. I wouldn’t want to have to replace the shutter after just a few dozen bug portraits. Third, flash spooks some bugs.
Continuous light sources such as LED’s permit faster sequential shooting and the use of the indestructible electronic shutter. But I find that many bugs hate continuous bright light in their faces even more than they hate flash.
Beside its quantity, the quality of the light is a concern. Whatever the light source, its output needs to be soft, that is, from the point of view of the bug, the light must emanate from a large area. This is because a bug's exoskeleton is made of a myriad of shiny little parts that create distracting, often colorful specular reflection and diffraction patterns under strongly directional light.
Diffused artificial lighting is bulky by its nature and therefore difficult to bring close to subjects that sit anywhere but on the most exposed leaves and branches, which is to say, most of my subjects. I often find that my lens setup, which is comparatively slender, is already quite bulky without any attached lighting paraphernalia. I therefore try to use diffuse natural light such as open shade as much as I can. I find it generally more pleasing than artificial light anyway, which tends to look overly theatrical because of its pronounced falloff towards the background. Natural light is also more varied, and it produces much nicer catchlights in spider eyes. With some luck, it is just about bright enough for stacking at large apertures, provided bugs and wind cooperate.
Focus Stacking, Camera
Focus stacking can be accomplished in three ways: by moving the lens, by moving the camera, or by moving the sensor. The first two methods shift the projection point and thus change perspective. The third method doesn't do this and thus would seem preferable in theory. But it is more cumbersome because it involves moving the back standard of a bellows system. Luckily, the perspectival change induced by the first two methods is small and gradual enough to have no discernible effect on the end result; so we needn't wrestle with bellows. Refocusing by moving the camera can be done manually or with a motorized focusing rail, but neither is as quick or as simple as letting the camera automatically refocus the lens, which most recent cameras can do. It is this method that I use most.
There is one notable drawback to stacking by refocusing the lens. It is that the quality of the image slices deteriorates from front to back. With deep stacks, this can become a problem. Macro lenses, like most lenses, exhibit a behavior called “focus breathing”: the closer they are focused, the narrower their effective angle of view becomes. This is again easy to see with a simple lens that is focused by changing its distance from the sensor. The lens projects a cone of light whose cross-section in the sensor plane is the image circle for a given focusing distance. As we rack out the lens to focus more closely, the light cone moves along with it, the image circle grows in size, and the sensor captures an ever smaller proportion of the circle. We are effectively cropping the image. This isn’t a big deal in general photography (although it is in videography), but it becomes very pronounced at high magnifications involving significant focus travel. The following illustration shows the first and last slice of a stack and then the composite result; the actual word “Joe” is about 4 mm wide and 3 mm tall.
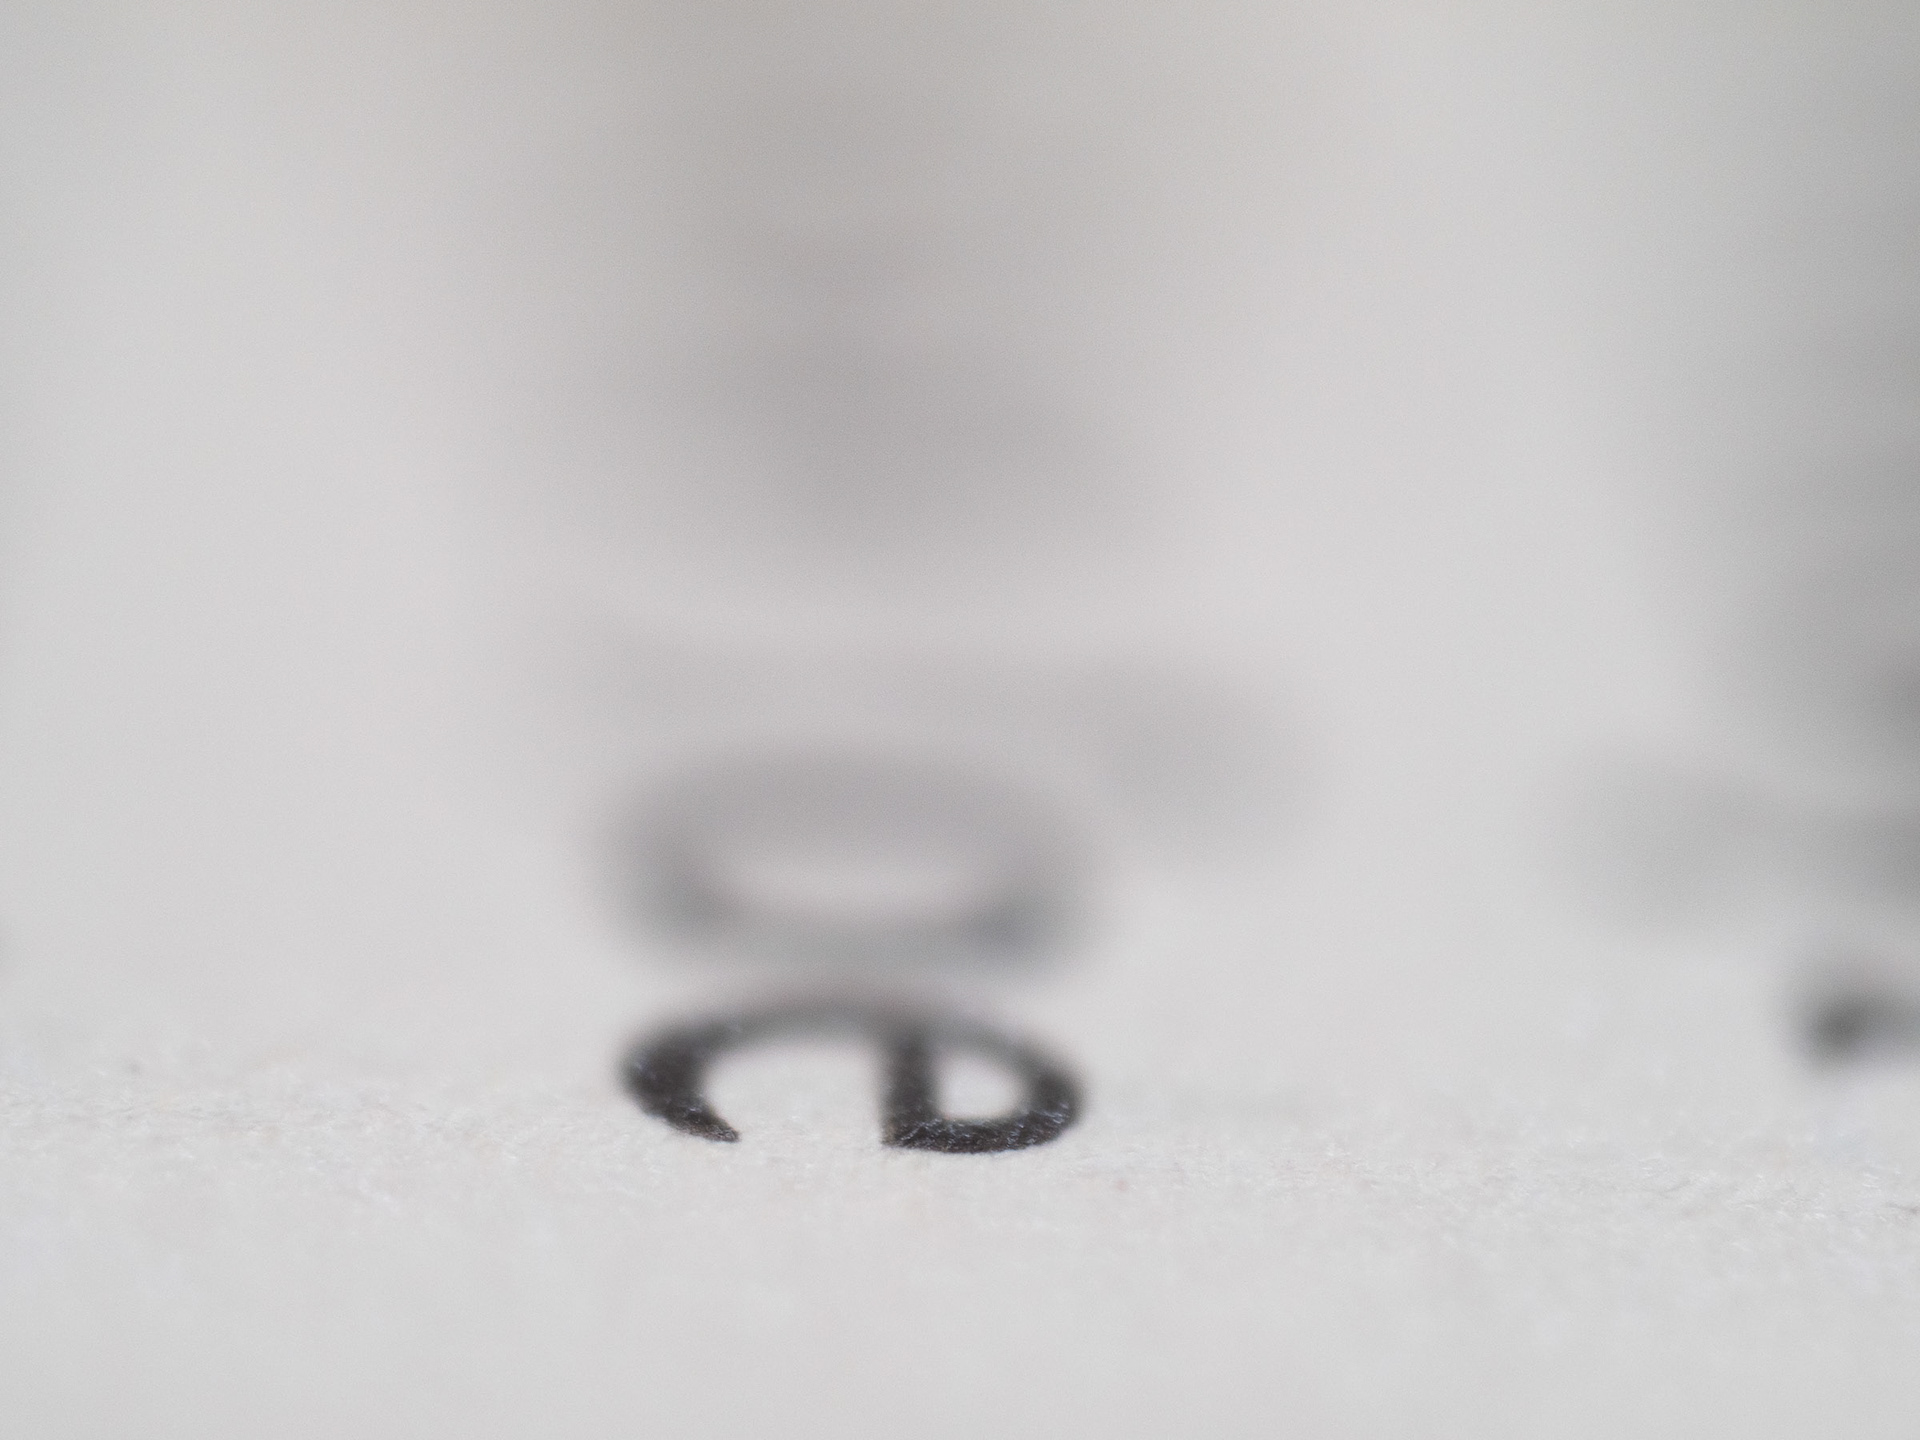
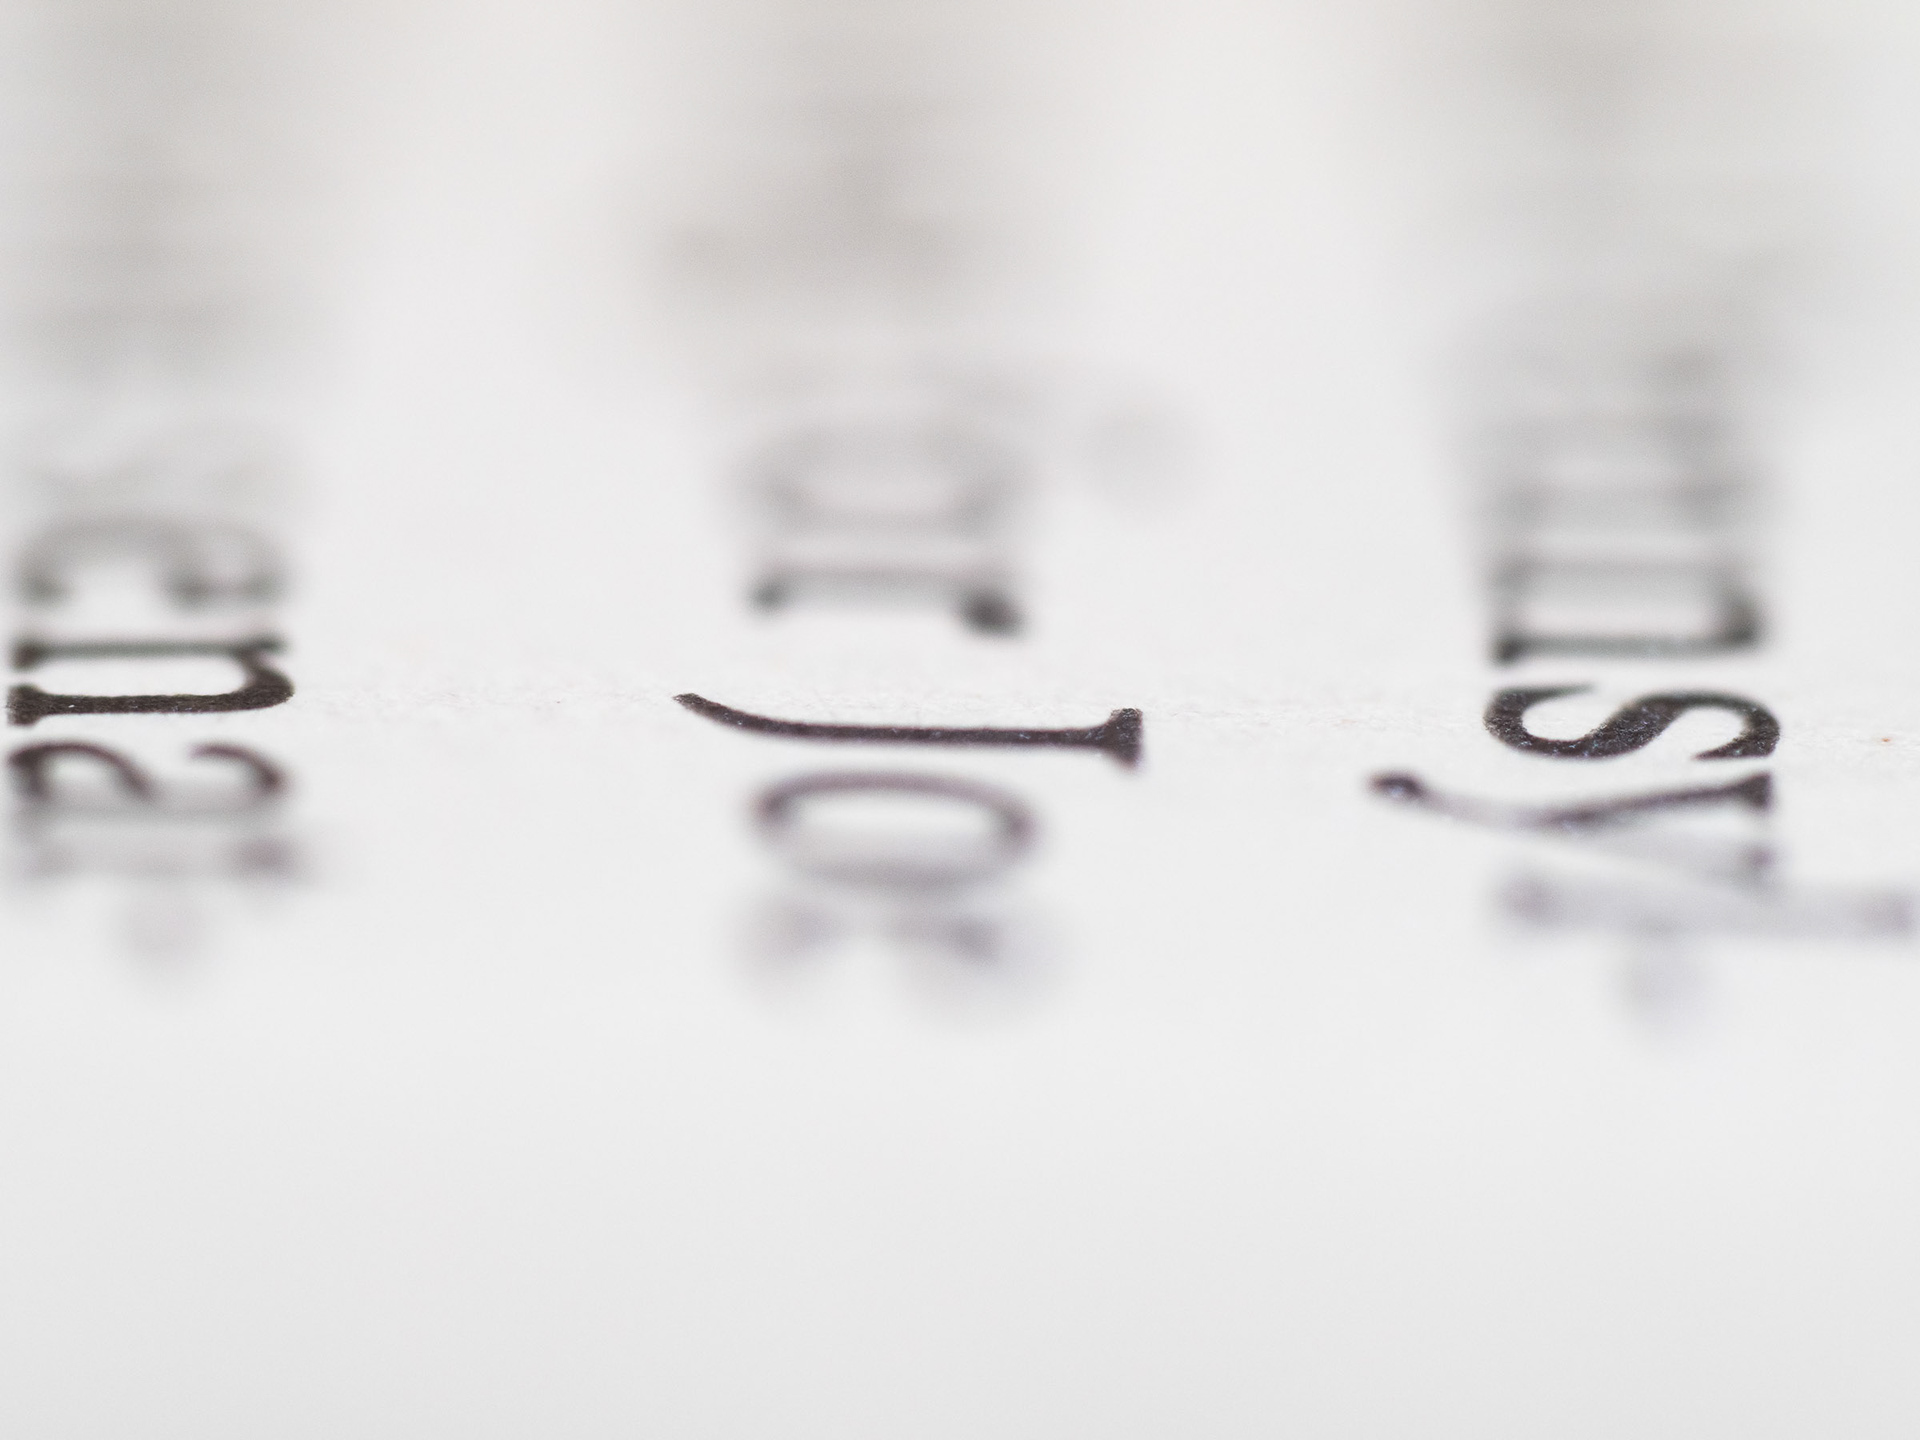
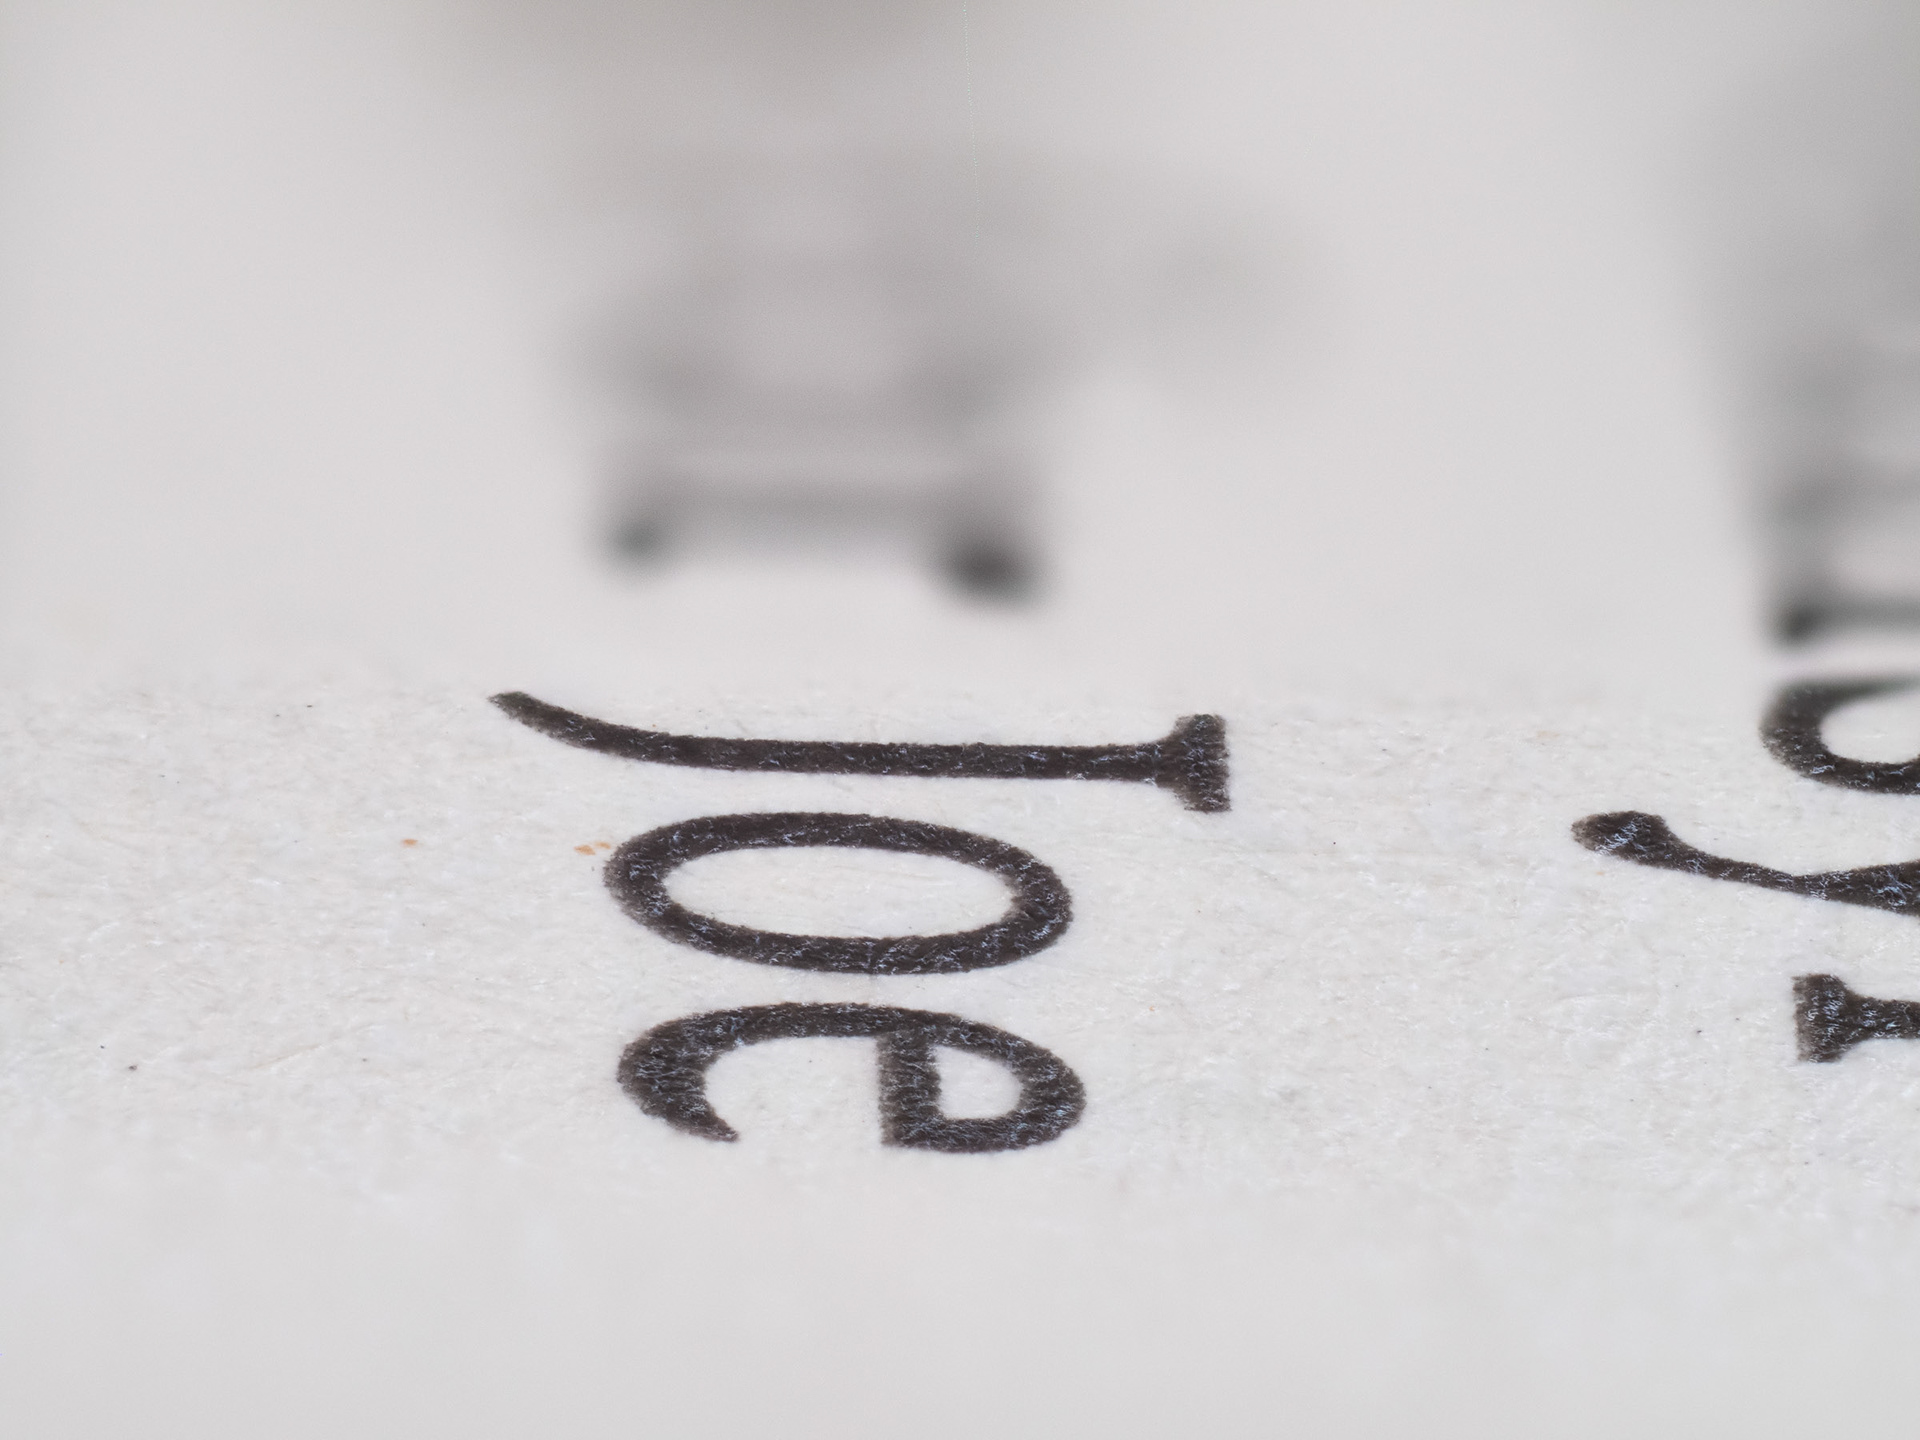
Look how small the letter “J” is in the last slice of the stack compared to its size in the composite! Refocusing implies a lower magnification ratio, hence wider framing, for the “J” at the end of the stack than for the “e” at the beginning. The composite takes its frame and pixel dimensions of course from the most tightly framed, nearest slice, so that all the other slices can be matched up with it by suitable enlargement and cropping. In the example, the J-slice is enlarged linearly by 157% (245% by area) to fit into the composite; I measured. Since the stacking software cannot create detail out of whole cloth, the result is as if we had photographed the “J” at the higher magnification ratio of the e-slice, but with a camera of much lower resolution. Moral: beware of detail deterioration in the depths of the scene.
You may also have noticed that the J-slice received about half a stop more exposure than the e-slice, which must also be attributed to its lower magnification since shutter speed, aperture and ISO settings remained unchanged. (Given the numerical relationships just noted, I would have expected to see a solid one-stop difference. I can only surmise that the discrepancy has to do with lens design.) Second moral: beware of blown-out highlights in the depths of the scene.
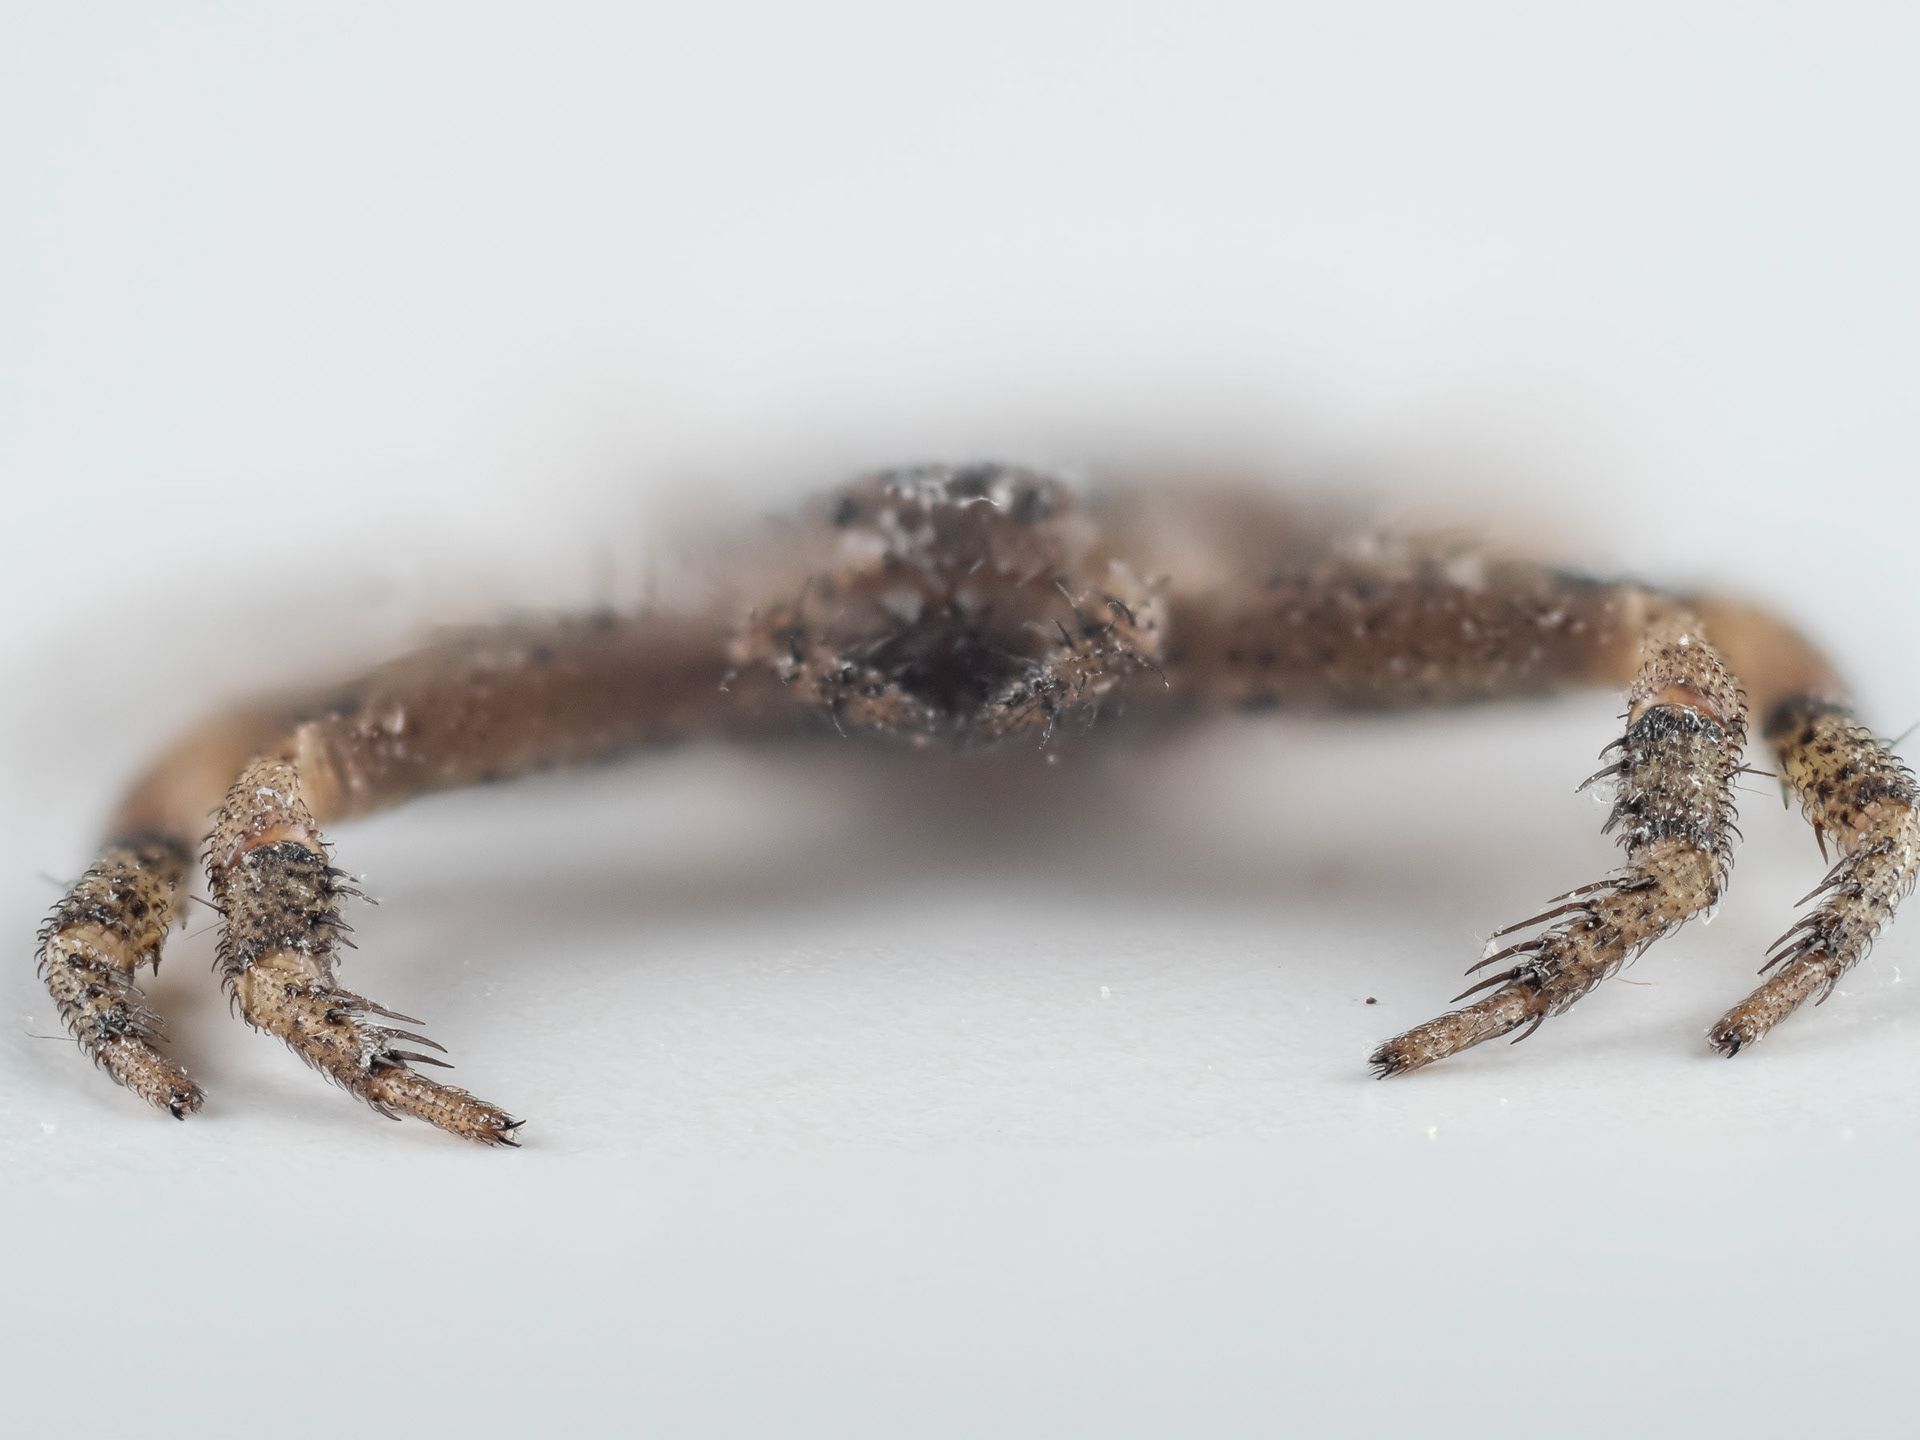
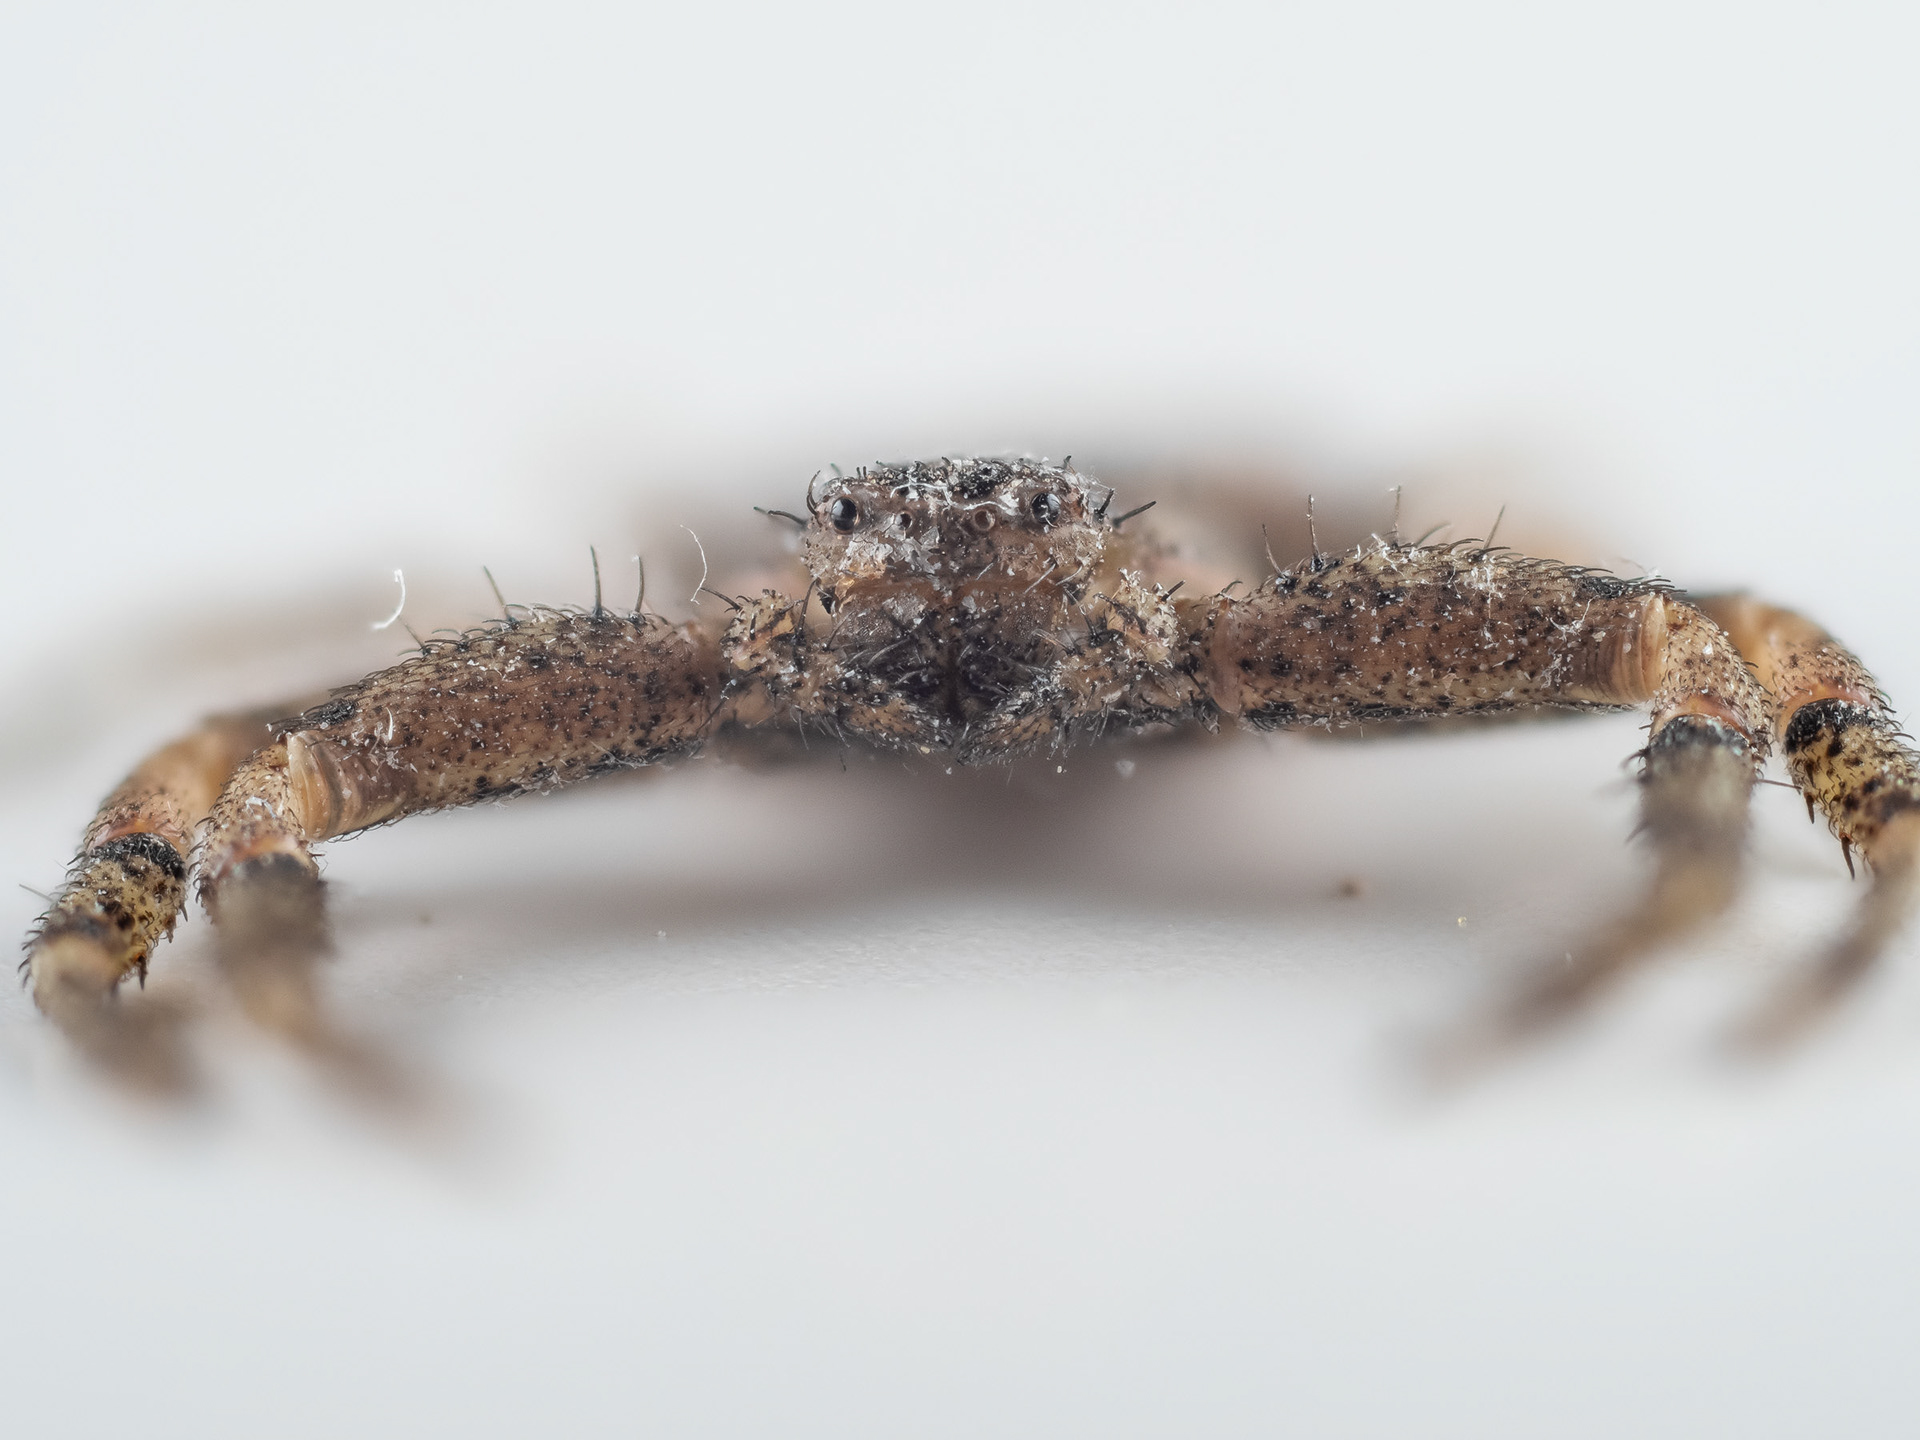
Here is a real life example. A miniscule crab spider on my desk had its front pair of legs extended far out towards the camera, and I wanted to show them and the face equally well defined. I started the first stack at the spider’s feet, only to watch its face shrink on the camera’s LCD screen to half its initial size before coming into focus near the end of the stack. Obviously, its definition in the composite would fall short. I therefore decided to ditch leg definition, move the camera closer, and make another stack starting right in front of the face. Miraculously, the spider didn’t move between the stacks. This allowed me to combine material from both stacks and thereby get the best of both camera movement and internal refocusing. From part of the first stack, I made a composite with only the first three leg sections in focus (left), which I could then combine with the composite from the second stack (center) for the final result (right). I was lucky. The perspective shift between the two stacks would make this sort of montage generally very difficult or impossible.

Because of this problem with deep stacks, it is rarely a good idea to focus on the tips of antennae or other body parts much closer to the camera than the rest of the bug. Refocusing is nonetheless my preferred stacking method because the alternatives are just too slow for living creatures, at least for those I encounter.
MFT cameras execute stacks much faster than larger systems. This speed advantage outweighs, for me, all disadvantages that MFT has on paper. I have consistently been able to get better results from the small discontinued Olympus E-M1 II that I bought for the purpose than what I get from my three and five times more expensive and otherwise superior FF Nikons. The main reason is that I can shoot a stack with the Olympus in a fraction of the time it takes with the Nikons, which dramatically improves the odds that the bugs won't budge. The speed gap wouldn't have to be this large if Nikon's stacking implementation weren't so pathetic: the sequence is initiated by selecting an item from a sub-submenu rather than by pressing the shutter button; it takes forever to commence; the aperture opens and closes between exposures, which wastes time and introduces gratuitous vibrations; and there is no telling what the bug is up to because the viewfinder blacks out for the entire sequence.
A nice fringe benefit of the Olympus system is that its autofocus hunts much less in the macro range than Nikon’s. Autofocus is generally dismissed as being too unreliable for macro work, but with today’s focus-by-wire lenses I find it useful for quickly getting focus and magnification into the ballpark. There are also situations in which manual focus is not an option because reaching for the focusing ring risks scaring off the bug. When using autofocus, one just has to remember to set the camera to “back button focus”. This decouples the AF-activation from the shutter button so that the camera doesn't go focus hunting at the start of the sequence. The sundry camera settings required for focus stacking can be conveniently saved and recalled as a single user setting. I use the three user settings available on the Olympus for three sets of stacking parameters where I vary step size from small to large for magnifications from small to large. The camera has a fully articulated screen, which is a godsend for work in awkward positions where the viewfinder is useless and a tilt-only screen is made illegible by sky reflections.
Not only does MFT have the edge on speed, its inherent resolution and noise shortcomings disappear under the conditions in which I shoot. On paper, the smaller MFT sensor is at a disadvantage because it requires twice as much magnification as FF for a final image of the same size. The quality loss from this higher magnification is mitigated to some extent by better optics and a higher pixel density, but FF indisputably wins when each system operates at its base ISO. Yet when settings are equivalent rather than ideal, as they tend to be out in the wild, the FF advantage vanishes. Equivalent settings mean the same shutter speed to stop motion, a doubling of the f-number on FF for the same depth of field and number of exposures in a stack, and a compensating 2-stop ISO increase. These settings make the results pretty much indistinguishable and sometimes even favor MFT because of its excellent noise management.
Lens
Olympus 60 mm f/2.8 Macro. It is very sharp (although I had to go through three decentered copies before I found a good one); its bokeh is pleasing, its longitudinal chromatic aberrations are acceptable, it vignettes much less than my FF Sigma macro lens, it is astonishingly small and lightweight (185 g, one quarter the bulk of a comparable FF lens), it has autofocus, as is required for in-camera focus stacking, and it is half the price of comparable FF lenses. There are many other wonderful macro lenses for MFT, but their lack of autofocus makes stacking in the field a bit of a pain. I haven’t had much success with the ingenious “turbostacking” methods people have devised for manual-focus lenses, from turning the focus ring in burst-mode to souping up a focusing slider with an electric screw driver.
Most so-called “macro” lenses achieve a maximum magnification of 1:1, irrespective of the size of the sensor for which they were designed. At their closest focusing distance, they all produce a life-size image of the subject in focus. Since the MFT sensor is half the (linear) size of the FF sensor, this image is twice as large relative to the former as it is relative to the latter. This relationship is sometimes touted as a 2:1 magnification advantage for MFT. But that’s like saying that I am taller than you because I measure more in centimeters than you measure in inches. If the output of both sensors is enlarged to the same image size, then indeed the subject will be twice as large in the MFT image as it is in the FF image. But this is because the MFT image was enlarged electronically twice as much as the FF image, which is hardly cause for gloating. There is an advantage here for MFT users, but it has to do with equipment size, weight, and ease of use, not magnification. The advantage is that filling the MFT frame is much easier than filling the FF frame. To match the native frame-filling capability of the Olympus lens, a comparable FF lens needs to be heavily tricked out with the add-ons described in the next section. One can of course instead crop the FF image for a match, but a 2x linear crop from even the best FF sensor is visibly inferior to an uncropped MFT image.
Boosting Magnification
At 1:1 magnification, MFT renders a 17.3 mm wide area in focus. Most bugs are smaller than that. If we want to portray a bug from the front and give it prominence in the frame, we may be looking at an area less than 1/2" (13 mm) wide. This area must be stretched across the MFT sensor, which involves a magnification ratio of at least 1.3:1 (2.6:1 on FF). How can this be accomplished?
There are three ways to boost the maximum magnification of a lens while retaining its autofocus capability for in-camera stacking: by increasing its distance from the sensor, by outfitting it with the equivalent of reading glasses, and by enlarging its image before it reaches the sensor. The respective add-ons are: extension rings, close-up lenses, and teleconverters. They all degrade the quality of the image, but less so than cropping would. Close-up lenses vary dramatically in quality. The multi-element Raynox DCR-150 and DCR-250 are probably the best ones around and reasonably priced. I find them entirely adequate for my purposes even though they suffer from significant sharpness falloff towards the edges of the frame, which makes them ill-suited for flat-field work.
A standard set of MFT extension rings (16 mm + 10 mm) between the camera and the 60 mm macro lens reduces the width of the in-focus area from 17.3 mm to 10 mm, corresponding to a magnification ratio of 1.7:1. The popular DCR-250 lens yields a similar ratio of 1.6:1. A 1.4x teleconverter delivers, you guessed it, a ratio of 1.4:1. Extension rings and teleconverters diminish the effective aperture in proportion to their magnification boost (by one stop for the teleconverter, by 1.5 stops for the extension rings). Close-up lenses do not do this, which counts in their favor with respect to diffraction as well as exposure – provided they are of decent quality. The various add-ons can be combined: I often use the Raynox lens in combination with one or both of the extension rings for up to 2.5:1 magnification, or an in-focus area 7 mm wide. Some people add a teleconverter to the mix. I haven’t tried this but I hear it gets a bit tricky. The Olympus converter isn’t meant to be used in conjunction with the brand's macro lens, but it can be attached with the right off-brand extension ring as a spacer.
I should note that the numbers reported here are measured and don't quite agree with those from various calculators on the web. The discrepancy comes, I suspect, from the fact that real lenses behave only approximately like the ideal lenses modeled by the calculators.
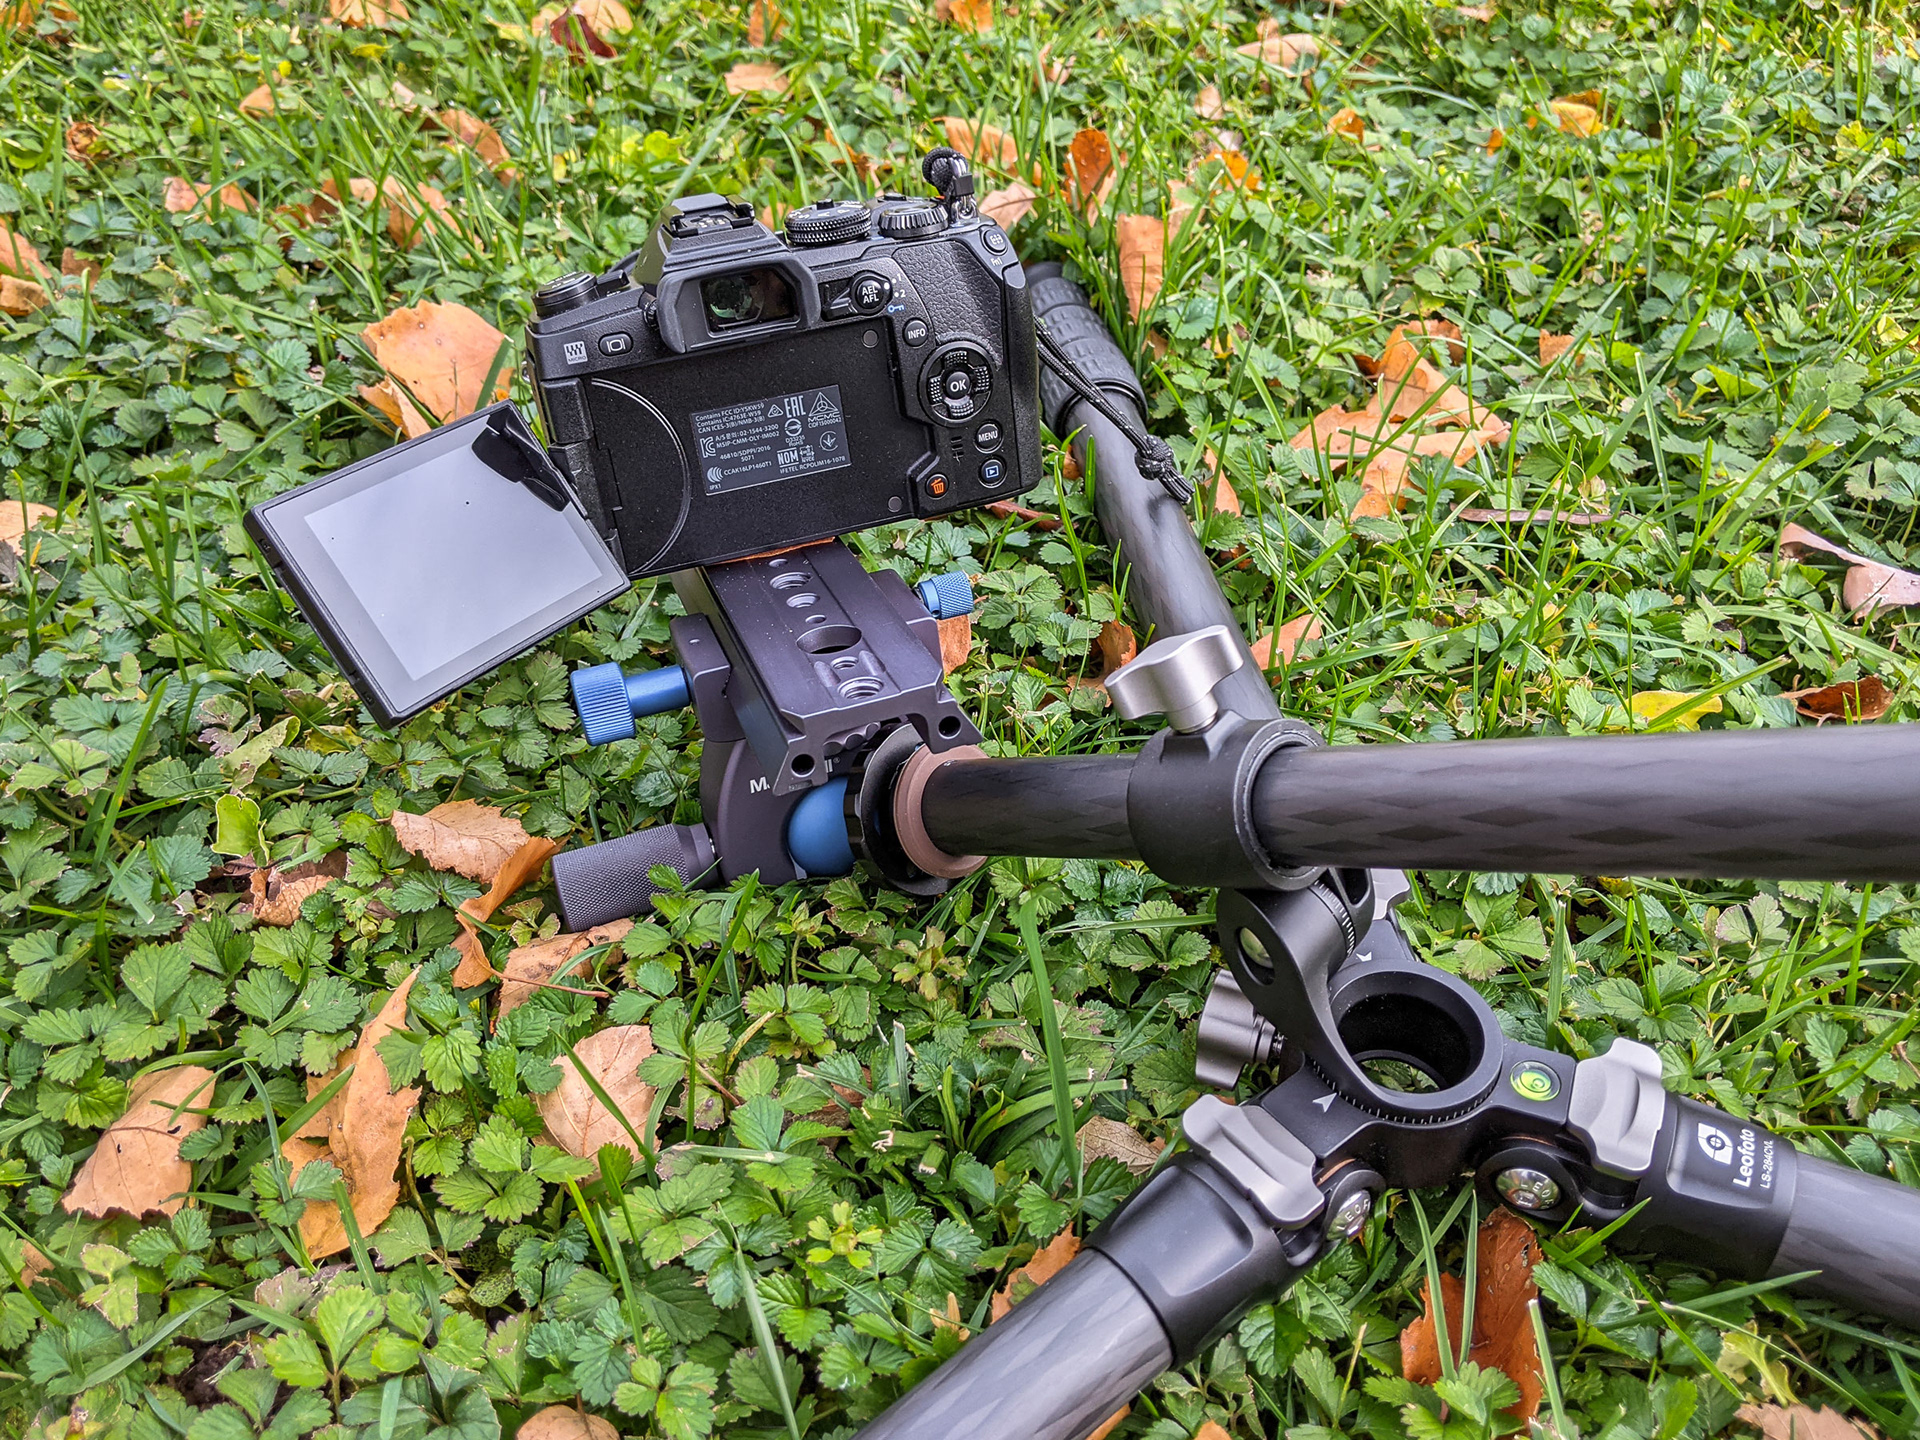
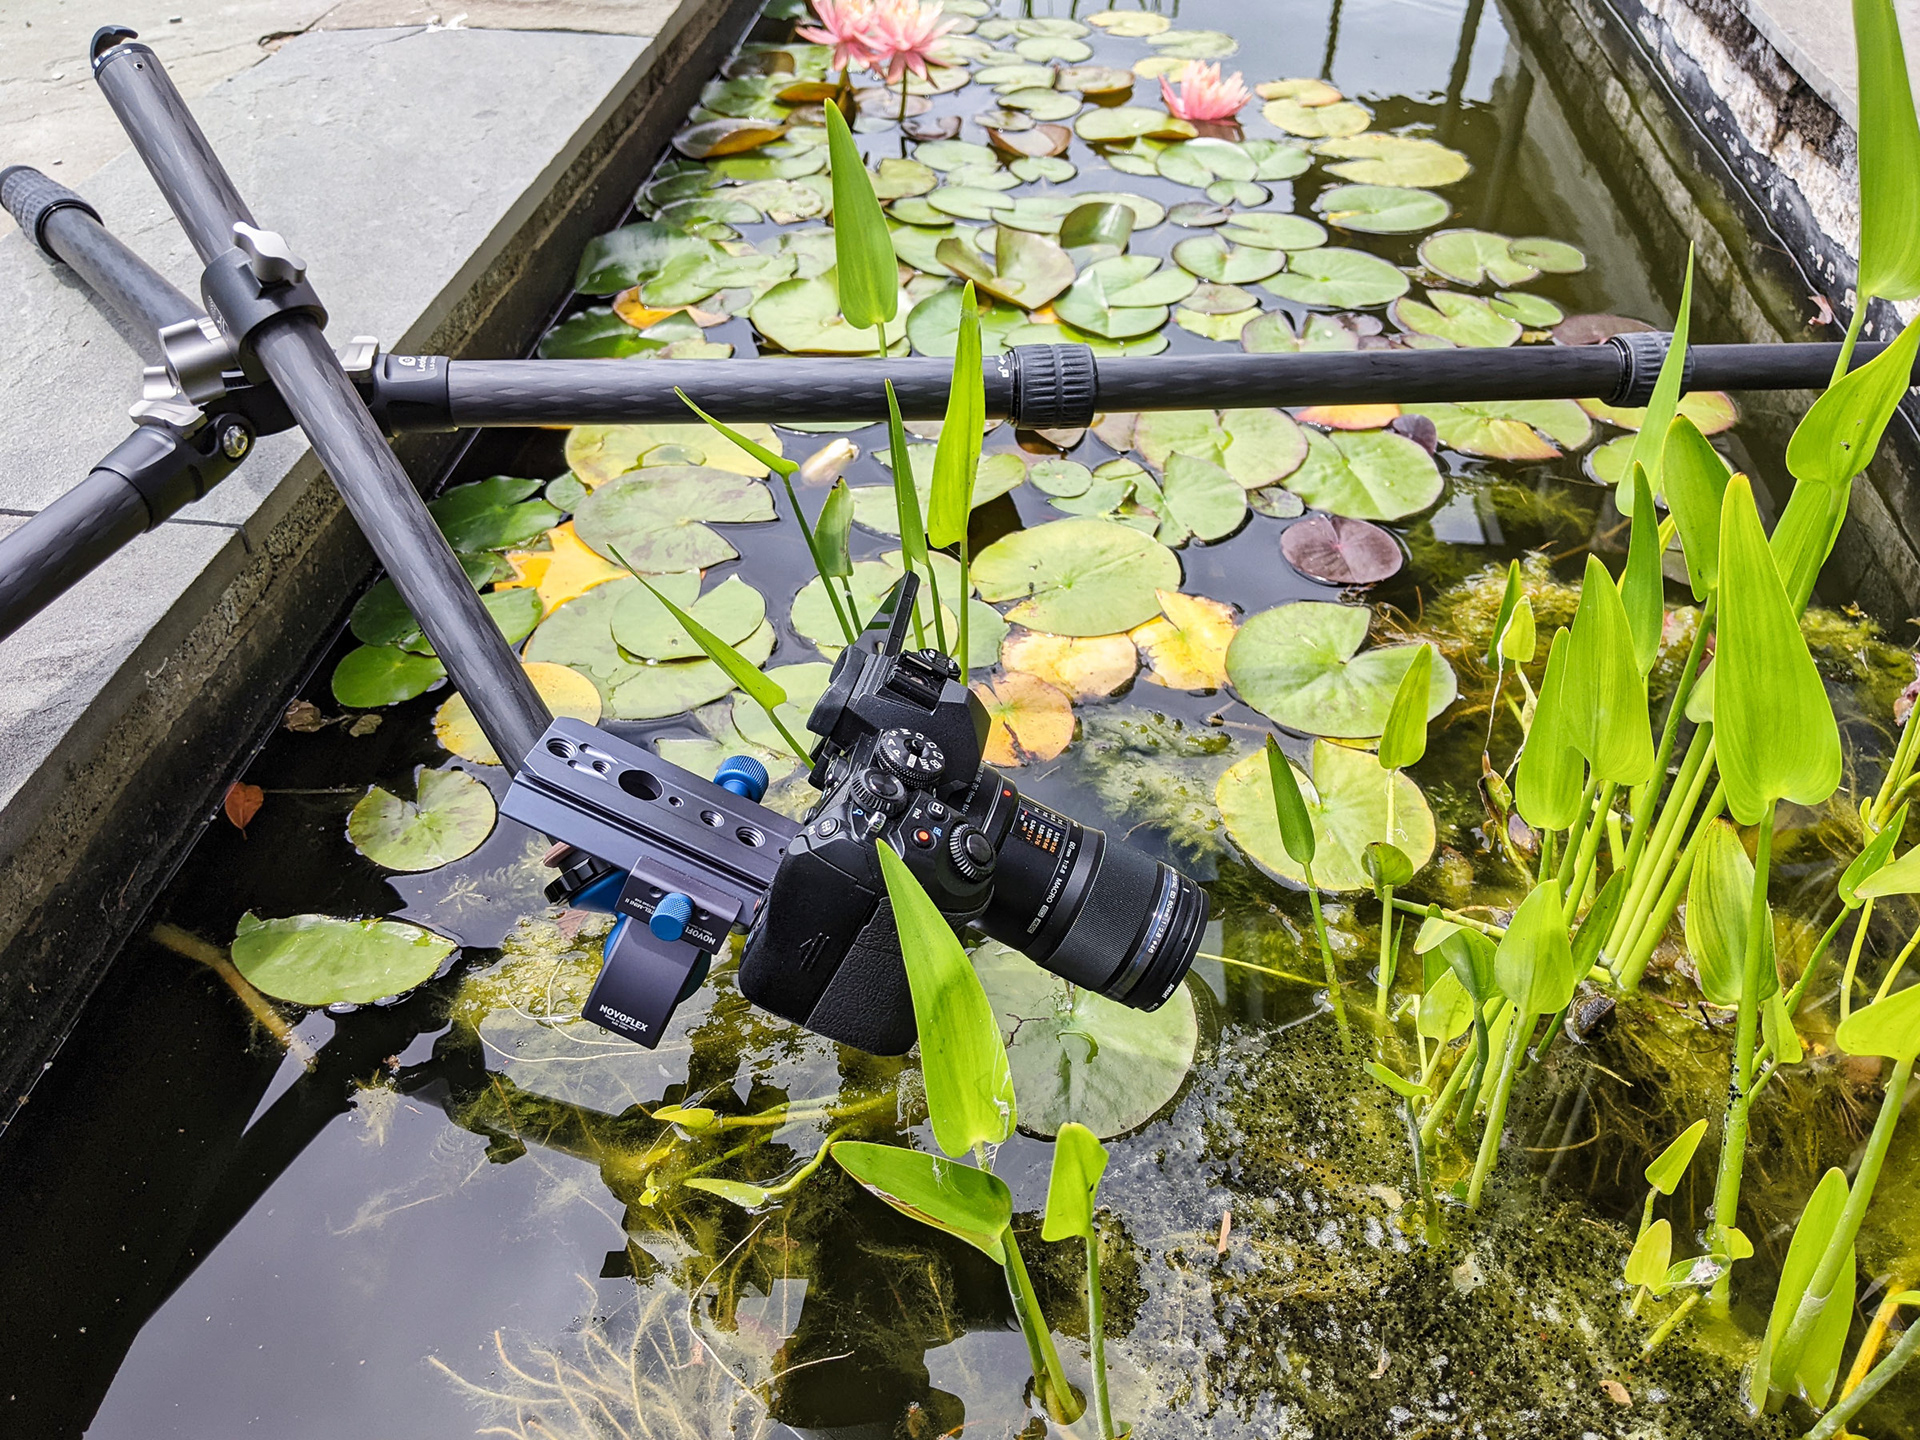
Tripod
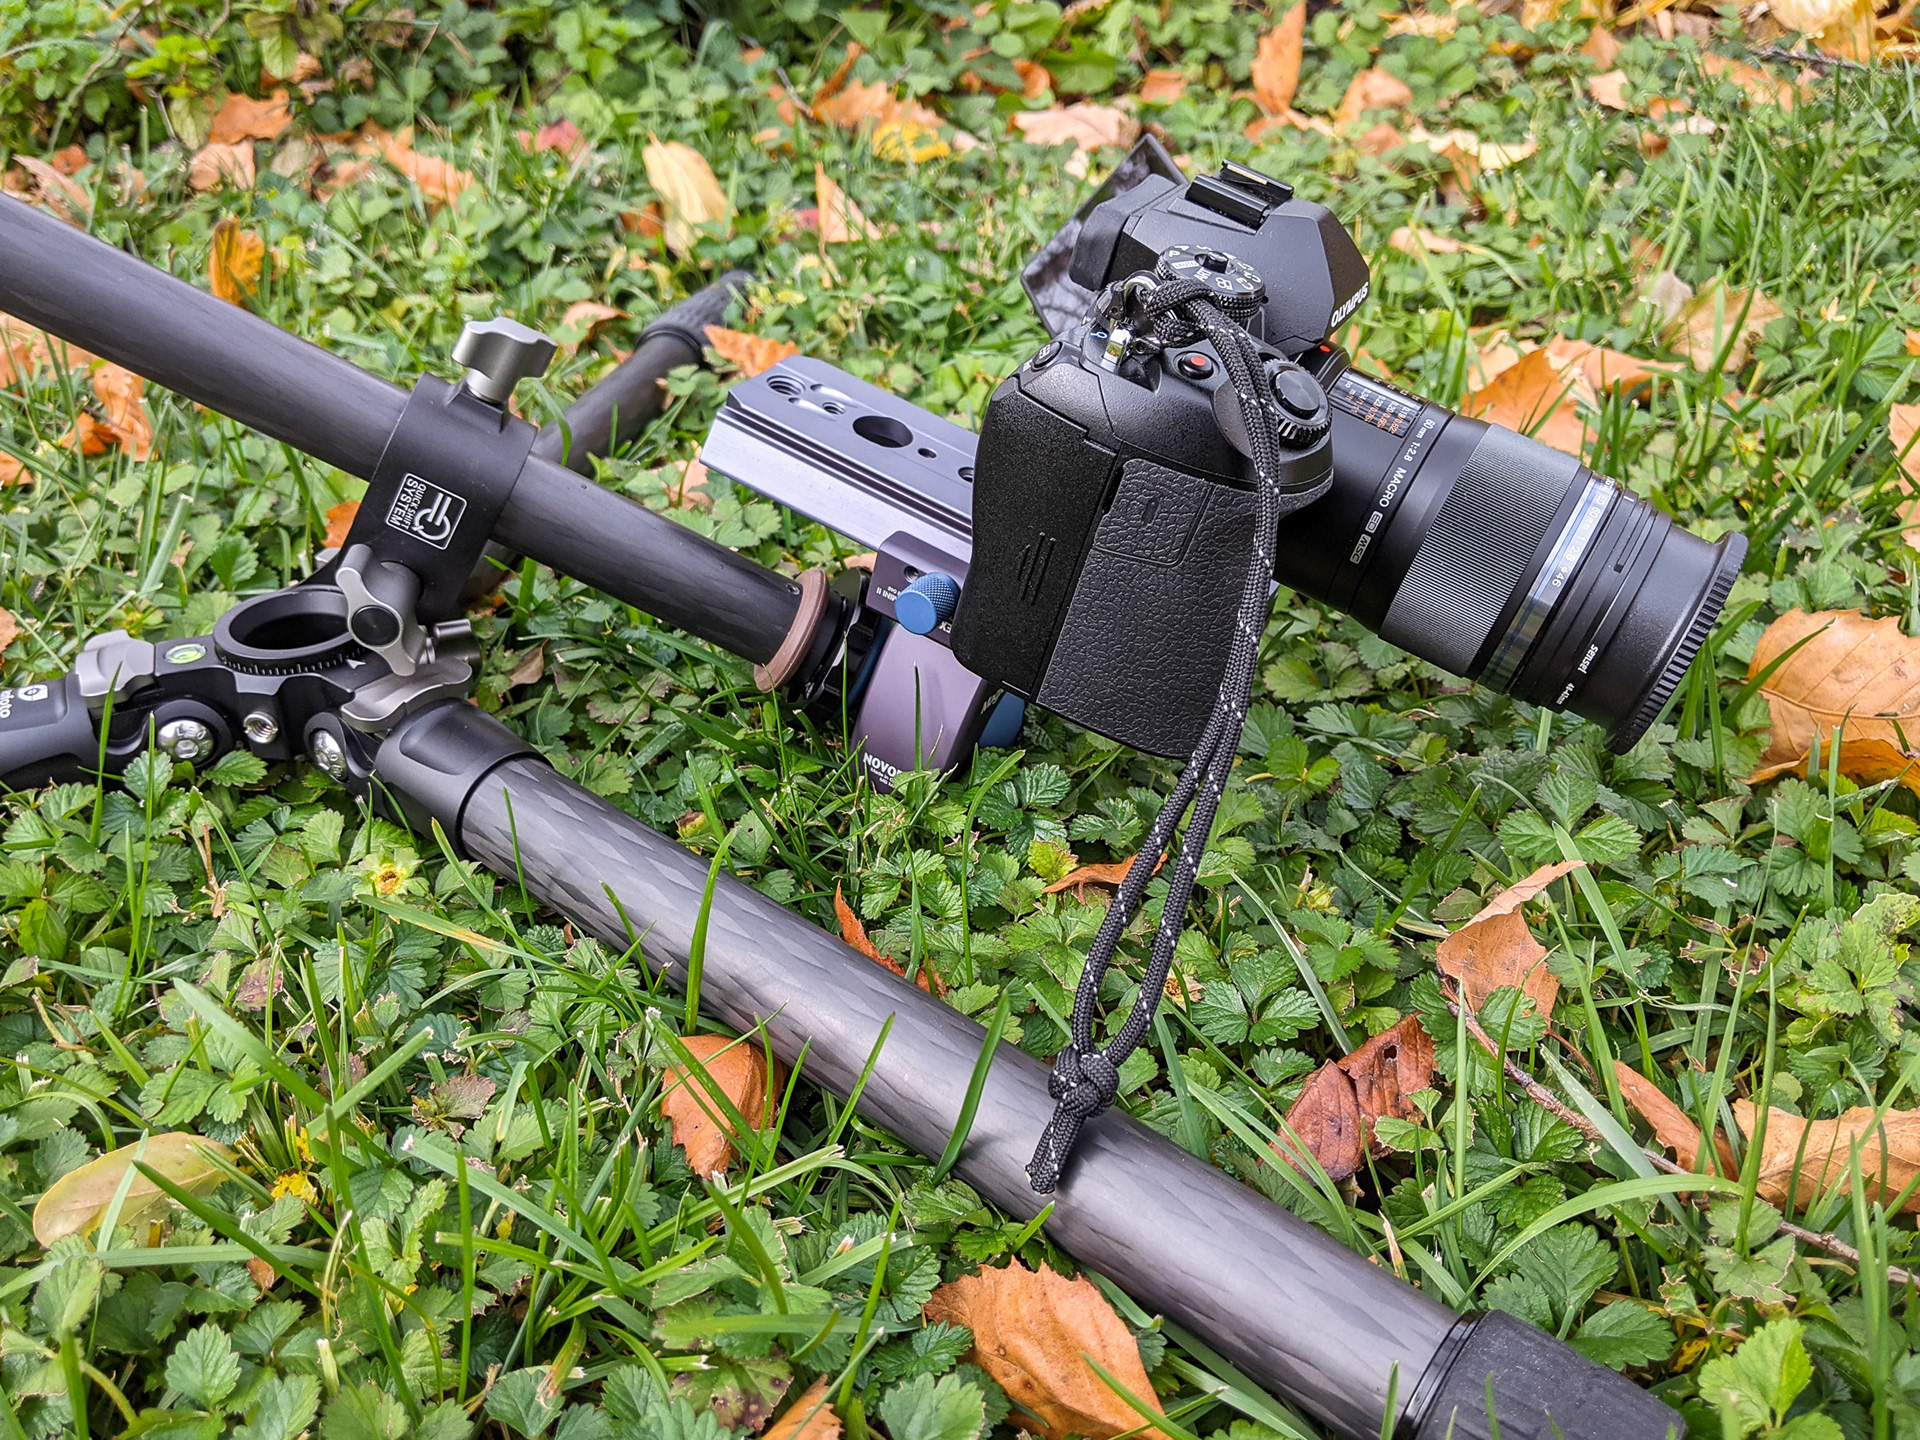
Some people report being able to shoot focus stacks handheld. My hands are steady enough for stacks of maybe half a dozen frames, on a good day. For real stacks, I need a tripod. The tripod must meet the usual requirements of sturdiness, a good stiffness-to-weight ratio, no play, and positive locking. In addition, it should facilitate work in awkward positions, with the camera at some distance from the tripod axis or close to the ground. There is an almost mythical Swedish wooden tripod that is supposed to tick off all the boxes, but it is impossible to procure. The next best thing I could find stateside is the Leofoto LS-284CVL carbon fiber model which has a center column that can be turned sideways to become an outrigger. It is a featherweight compared to my old Gitzos, but it is strong enough for the lightweight Olympus rig. The outrigger is really useful for sticking the lens deep into the shrubbery where the bugs hang out. One has to be careful, though, because everything gets a bit wobbly due to cantilever loads and a shifted center of gravity. But, crucially, vibrations die down quickly. You can see some of the possible configurations below (with the Raynox 250 lens attached to the Olympus 60 mm f/2.8). What's also nice is that I can shoot even closer to the ground than with a dedicated ground pod. I would not entrust the outrigger with heavier equipment such as a FF rig. How the tripod will hold up over the years remains to be seen.
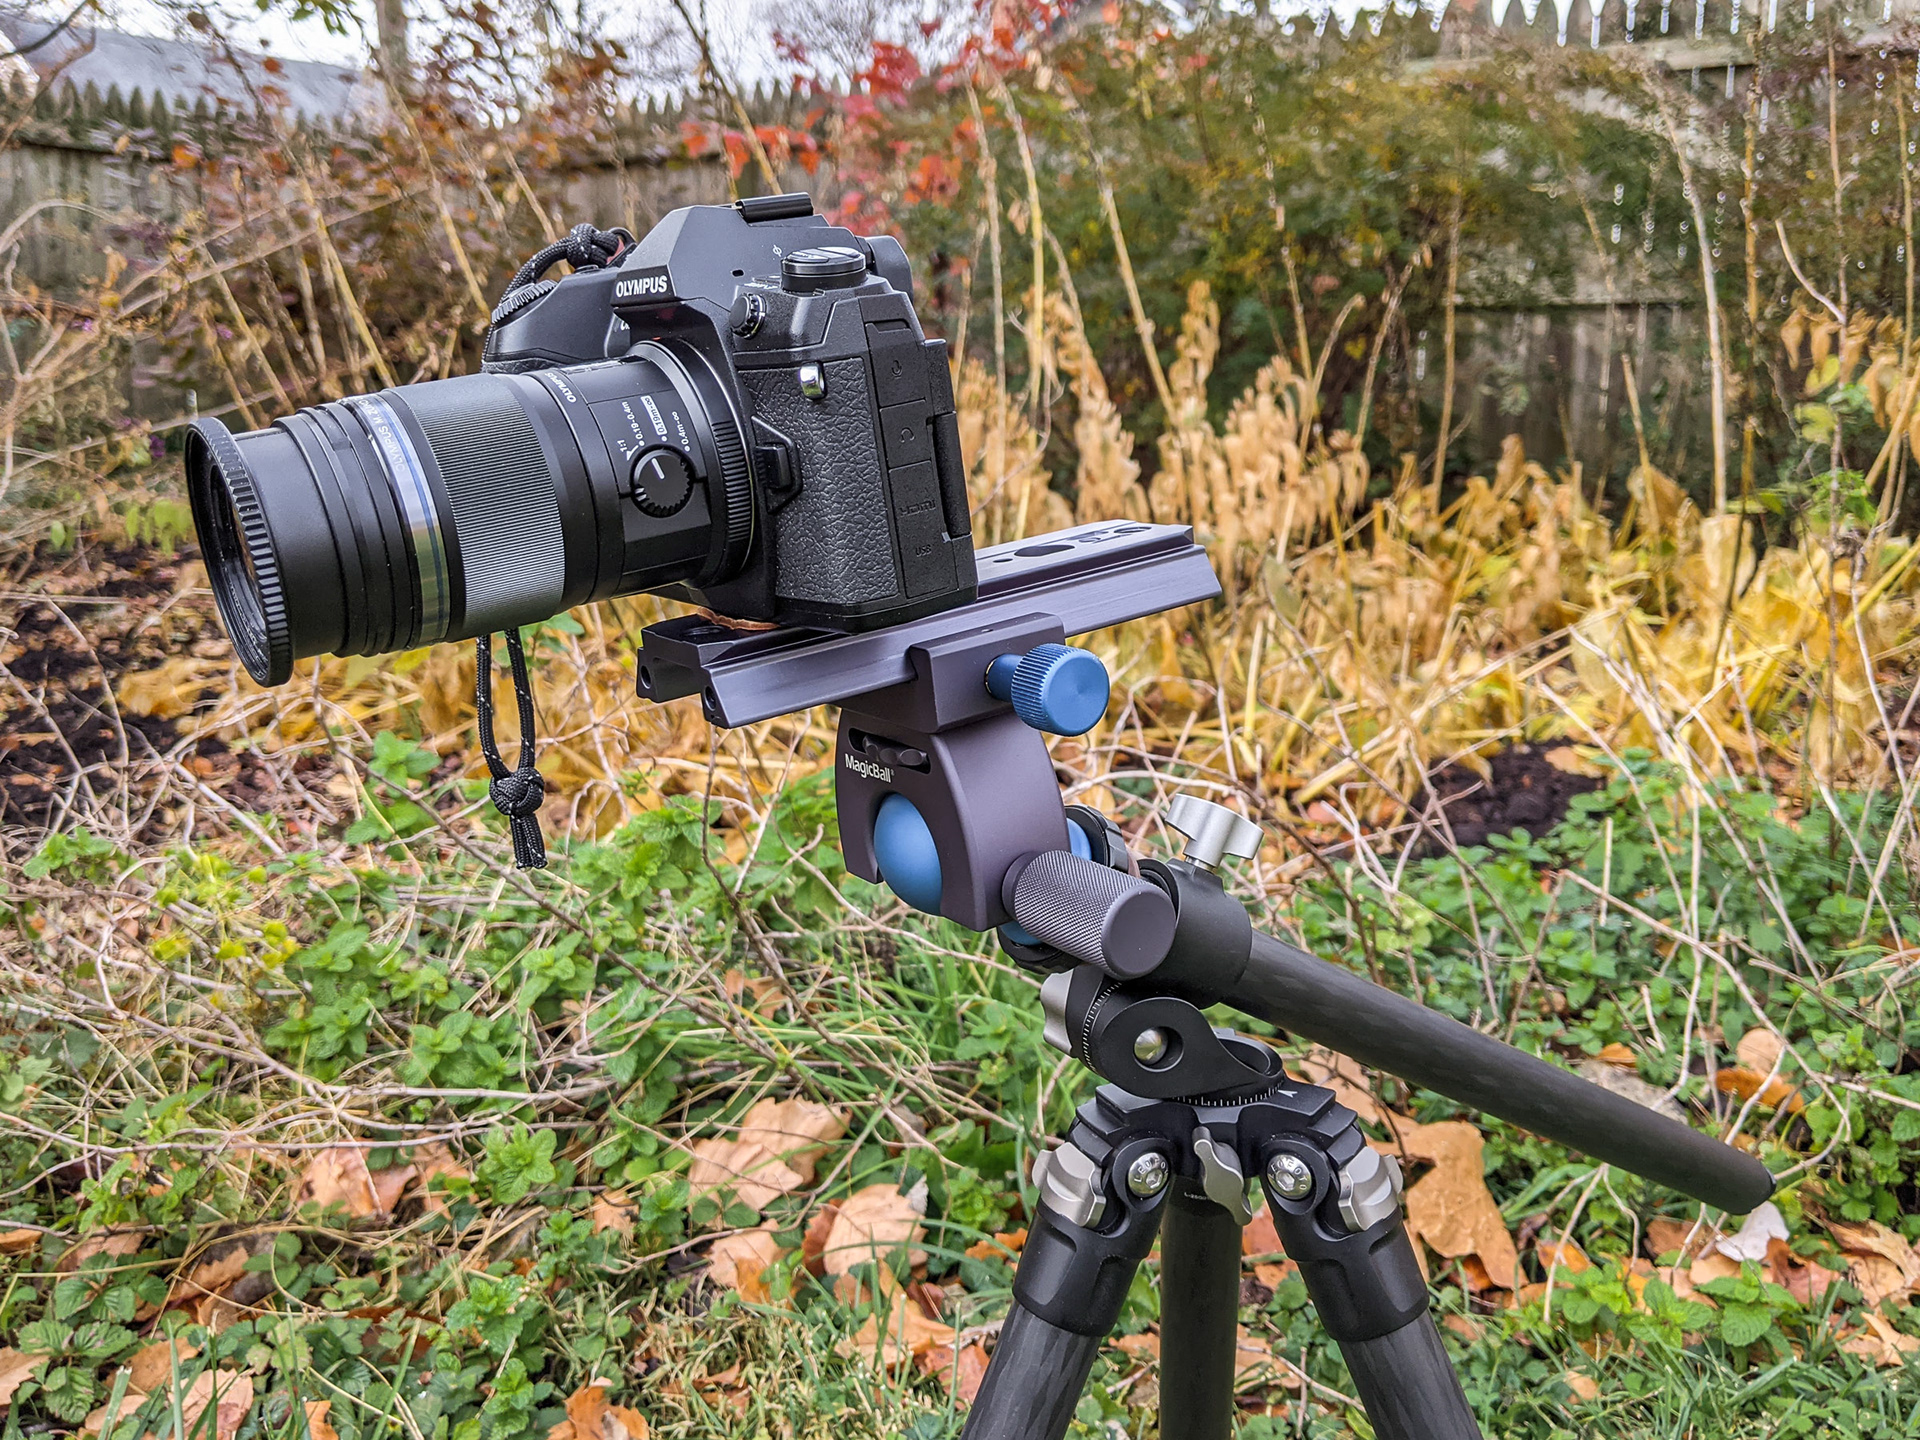
Tripod Head
My first choice was a geared Arca-Swiss Cube from my architectural work. It is self-locking and allows very precise and smooth independent adjustments around four axes. It is a joy to use, but it wants to sit on a sturdy tripod with a vertical center column. The outrigger, however, requires a strong yet lightweight ballhead. After some trials with RRS and FLM models, I settled on the Novoflex Magic Ball Mini. Its range of motion dwarfs that of a conventional ballhead, which really helps with camera positioning. In particular, it allows camera leveling on a downward-pointing outrigger (see images above), which is impossible with a conventional ballhead unless it is mounted on some sort of angle bracket. The Magic Ball locks and unlocks with less than a quarter turn of its single large knob, which means that I don’t have to change my grip and that I get good tactile feedback about the locking status. Its smooth movements make fine adjustments fairly easy, though not as easy as they are with a geared head. I use the head without a quick-release clamp to save weight. The Magic Ball has pretty much replaced the Arca Cube in my macro work because I want my equipment ready to go and not waste time swapping out heads while the bugs get restive.
Focusing Slider
I highly recommend using one. You may wonder what the point is if one lets the camera do the focus stacking. There are three points, actually. First, the slider allows you, with the tripod already in place, to slowly advance the camera towards the subject without scaring it away. Second, in combination with lens focusing, it lets you fine-tune the magnification. Third, it lets you adjust the stack’s starting point without messing up the framing. I use a Novoflex Castel Mini II whose precise rack-and-pinion drive works smoothly and quickly for both coarse and fine adjustments, better than the more common and less expensive screw-driven sliders. In the past, I used a simple nodal rail in an Arca-style clamp. This does the job but is much harder to adjust because it sags a little while the clamp is loosened so that frame and focus point shift when the clamp is tightened. There is no play in the Novoflex rail, so this problem doesn’t arise. The drive mechanism is stiff enough to hold the camera in place unless the rail is steeply tilted. For that situation, there is an adjustable tension knob. The rail is light enough for the outrigger, unlike the beautiful units from the 1960s made by Minolta and other companies. Lest I start sounding like a Novoflex fanboy, let me say that the knurling on Novoflex knobs is so sharp-edged that it can take the skin off your fingers.
Remote Release
I don’t bother because it is yet another thing to lose, and it offers little benefit for the way I work. Instead, I dial in one or two seconds of shutter delay to allow vibrations to die down after I let go of the camera. A remote release wouldn't shorten this delay. I have my hands on the camera and rail until the last second for final adjustments in response to the bug's antics. Once I take them off, vibrations need time to die down anyway before the exposure can begin, and a remote release would only add an additional step to the process.
Clamps
Occasionally, I use a crocodile clamp on a light stand or a small tripod to fixate an unruly twig or leaf. Many bugs dislike it and immediately decamp. It didn’t work at all when I needed it most, which was for the minuscule gnat ogre robber fly perched atop slender iris blades swaying in the breeze.
Binoculars
Last not least, my favorite piece of equipment: Pentax Papilio II 6.5x21 binoculars. They focus at less than half the distance of their nearest competitor, almost like a stereo microscope. They help me find bugs where I didn’t see any, they help me work out a composition and approach strategy (from which direction to bring in the camera, which twigs to bend out of the way, etc.), and they are just plain fun for observation. They are available in 8.5x magnification as well, but I prefer the steadier view through the 6.5x model, which is good enough to scrutinize the smallest bugs I can photograph. The optical quality at distant viewing is not bad, comparable to my 30-year-old 8x25 Trinovids, but the real excitement is at close range. These binoculars are incredibly cheap to boot, on par with a good close-up lens.
Post Processing
Focus stacking generates vast numbers of files. The Finder on a Mac used to be pretty good for a quick perusal, much faster than Lightroom. This has changed with recent operating systems. I therefore now use FastRaw Viewer, an inexpensive app that makes organizing the files and deciding which ones to process much more efficient than any other file management system I have tried.
A small number of frames can sometimes be successfully stacked in Photoshop, but for deeper stacks I know only two serious contenders: ZereneStacker and HeliconFocus. Zerene used to be touted as the gold standard, but I no longer use it because of its slow performance, inability to handle RAW files, and antediluvian interface that reflects a general lack of upkeep. Some people claim that Zerene gives them technically better results than Helicon, but I haven’t noticed it in my work and therefore doubt the difference is dramatic. At any rate, the other factors – speed and RAW capability – are decisive for me.
Speed matters because often it isn’t clear which stack from among similar ones will work best or whether a stack with a little bit of subject movement is salvageable. So I have to process them all and compare. With Zerene, I first have to prepare TIFFs or JPEGs and then wait for an hour or more for a single stack to render. This is excruciating, especially in situations where I have a captive bug waiting to be released as soon I have made sure that I have the photograph I want. Raw capability matters because the stacking algorithms increase noise, but less so with RAW input files than with TIFFs or JPEGs. The DNG files that Helicon can output are also more malleable in post processing. This makes a difference for those of us who don’t have enough storage space to keep the huge number of input files around for very long. When I need to go back to the drawing board because I made a mistake early on in the editing chain, I prefer a DNG over a TIFF or JPEG that has white balance etc. baked in.
Stacking results tend to require some retouching in the stacking software, most commonly because an opaque feature is rendered transparent. After that, they need attention in a standard image editor. They benefit from a good amount of deconvolution sharpening (the “Detail” slider in Lightroom). Often there are wide halos along well-defined edges that can be tedious to impossible to address in the stacking software. Some methods from portrait retouching (e.g. frequency separation) are helpful here to prevent a plasticky look. From there on it’s the same routine as with any other photograph, a balancing act in the many-dimensional parameter space of one’s editor of choice: a small magenta shift here, a little more highlight contrast there, a little less overall saturation, a little more midtone brightness, some unsharp masking...
